
Let Me Tell You Why I Keep Coming Back to This Crunch Wrap
Okay, so—funny story: the first time I tried making a Homemade Crunch Wrap Supreme, I completely underestimated just how messy things could get in the kitchen. Picture a tortilla avalanche and more cheese on the counter than in the wrap itself. But honestly, that’s half the fun, right? Cooking at home is never as tidy as those YouTube videos make it seem. My kid said it was “the best dinner ever,” and, well, that’s the real win. If you’re craving that Taco Bell goodness but with a little more control over what goes in (and probably a little less guilt), you’re in the right spot. Also, there’s just something about that crunchy middle layer that’s pure magic. Anyway, enough chit-chat, let’s get to the good stuff.
Why I Keep Making This (And You Probably Will Too)
I make this when I want to feel like I’m winning at both comfort food and getting the family to the table without complaints. My partner goes nuts over the crispy part—sometimes he even requests “double crunch,” which, yes, is totally a thing if you want it to be. When we’re having one of those “what’s for dinner, and why is the fridge empty?” kind of nights, I can usually cobble together enough bits and bobs to throw these together. (One time I used nacho chips instead of tostadas; not my finest hour, but hey, it worked in a pinch.) The real beauty is you can kinda make it your own, and if you mess up folding it, it still tastes awesome. And if you’re worried about calories, well… just put extra lettuce and call it a salad. Works for me.
The Ingredients (And Some Substitutions I Swear By)
- 1 pound ground beef (I’ve used ground turkey or lentils when feeling “healthier”; both work, but the beef’s my go-to)
- 1 packet taco seasoning (My grandmother used to make her own, but honestly, any brand from the store is fine. Or check Serious Eats’ homemade taco seasoning if you want to get fancy)
- 6 large flour tortillas (the bigger the better—they need to fold around all the goodness)
- 6 tostada shells (if I can’t find these, I just use crunchy tortilla chips. Sometimes I just make a thin layer of oven-baked tortilla for that crunch!)
- 1 cup shredded cheddar cheese (Monterey Jack or a bagged blend is fine, really. Even sliced cheese works if that’s all you have)
- 1 cup shredded lettuce (I occasionally skip this if I forgot to buy lettuce… nobody seems to mind)
- 1 medium tomato, diced (or salsa, or even nothing; up to you)
- 1/2 cup sour cream (sometimes Greek yogurt if I’m feeling smug)
- 1/2 cup nacho cheese sauce (optional, but wow, it makes things really pop. Store-bought is totally fine. I used Velveeta cheese sauce last week!)
- Olive oil or butter for frying (I use whatever’s handy. Even spray oil in a hurry.)
How I Actually Make These (No Judgement)
- First, brown your ground beef in a skillet. I usually chuck it in over medium-high heat and just break it up as I go—this is when I try to sneak a taste, but it’s always too hot (haven’t learned). Once it’s almost cooked, sprinkle in that taco seasoning, add a splash of water (the packet says 2/3 cup, but honestly, I eyeball it), and let it simmer till it’s saucy but not soupy.
- While that’s cooking, lay out your tortillas. If they’re stiff, I just nuke ‘em in the microwave for 10 seconds. Makes folding so much easier—trust me.
- Spoon a hearty scoop of the beef mixture right in the center of each tortilla. Don’t spread it out too thin; you want some oomph in there.
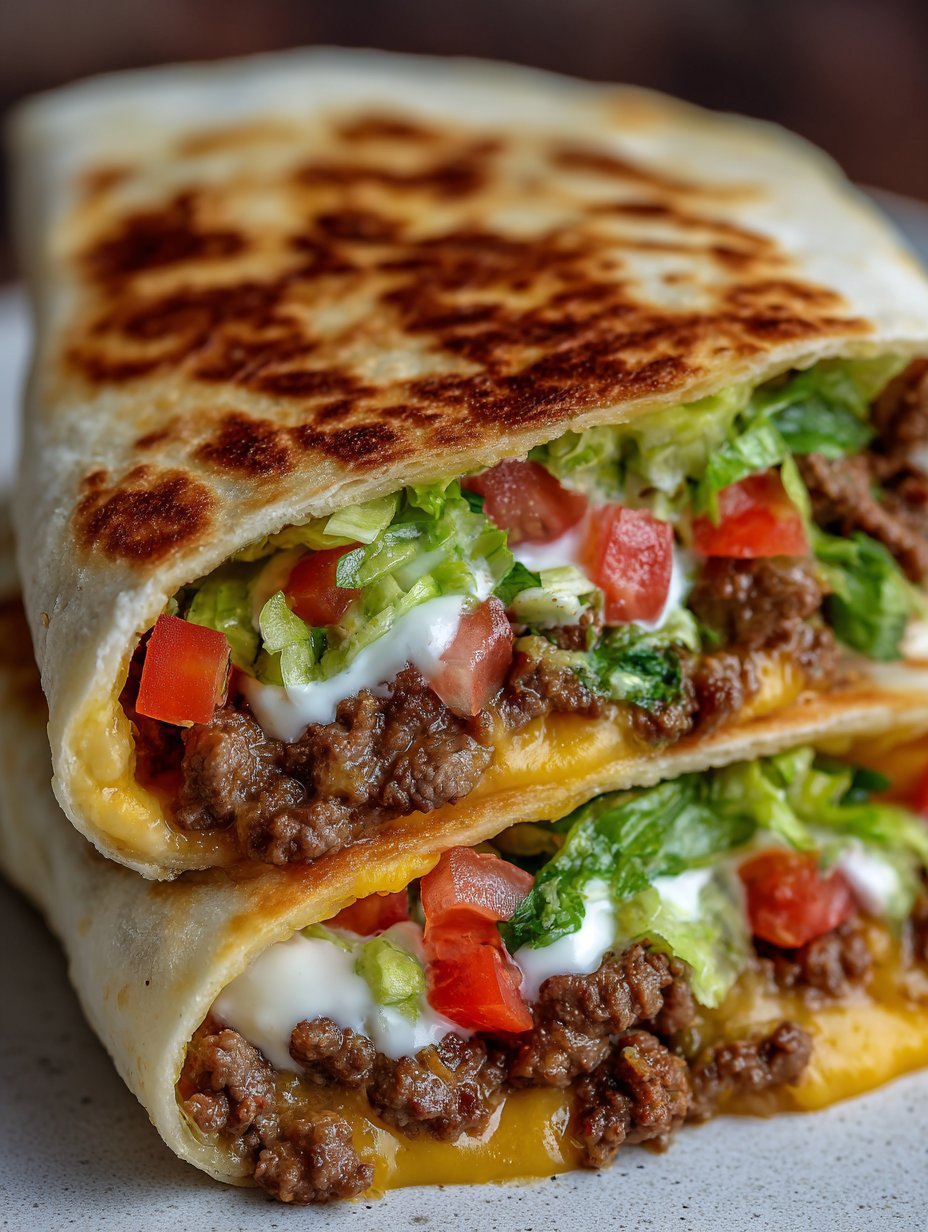
- Drizzle with nacho cheese sauce (if you’re using it), then add the tostada shell (or crushed chips—no one’s judging). On top of that: sour cream, shredded lettuce, diced tomato, and a generous sprinkle of cheese. I tend to get carried away with the cheese but, honestly, that’s never ruined anything for me.
- Here’s where I always worry I’ve overstuffed it. Fold the edges of the tortilla up, working your way around to make a little parcel. If it doesn’t close perfectly, just kind of squish it shut—gravity helps in the next step.
- Heat a large nonstick skillet over medium heat, add a bit of oil or butter, then pop your wrap seam-side down. Press gently with a spatula. Fry until golden and crispy (about 2-3 minutes), then flip and do the same on the other side. Sometimes I get impatient and try to flip too soon. Don’t—it’ll fall apart; speaking from experience.
- Repeat for the rest. I usually do two at a time because I can’t fit more in my pan. And, if one looks a bit wonky, I call it the “chef’s sample.”
Notes From Trying (And Failing) a Few Times
- If you overload, it will bust open. Not the end of the world—just a bit messier to eat. Actually, I think it tastes crunchier that way.
- Once, I tried using small tortillas and ended up with lots of mini-crunch-wraps. Cute, but fiddly. I’d stick to big ones unless you want tapas vibes.
- I find it reheats okay in the oven (never the microwave—it’ll go soggy), but honestly, it’s best fresh from the pan.
- Sometimes I add jalapenos, but the kids whinge. So, your call.
My Experiments (And Honest Mistakes)
- Tried it with pulled chicken. Really tasty, but a bit too wet—maybe less sauce next time?
- Once put in refried beans instead of beef. That was actually pretty great, especially for my vegetarian mate.
- Attempted to make it with cauliflower rice…eh, wouldn’t do that again. “Interesting” texture, to put it kindly.
Equipment I Use (And What To Do If You Don’t Have It)
- Big nonstick skillet—preferably with a lid, but you can just use a plate if you need to press things down.
- Microwave for softening tortillas, but if you don’t have one, just wrap them in foil and warm in the oven. Or stick them over a gas burner for a few seconds; just don’t walk away (voice of experience).
- Spatula for flipping—if you don’t have one, two forks will do in a pinch.
How I Store Leftovers (Sort Of)
If there’s any left (which, let’s be honest, rarely happens in my house), I wrap them in foil and pop in the fridge. They’ll keep a day or two, but they lose a bit of crunch—the oven can bring some of it back if you’re patient enough to reheat them properly. I think they taste even better cold, but my family disagrees. Oh, and never freeze them. Trust me, it does something weird to tortillas.
How We Serve ‘Em (And A Weird Tradition)
I usually cut ours in half, stack them up on a big ol’ platter, and put out bowls of salsa, guacamole, and sometimes even potato wedges—don’t ask, it’s just a thing. If it’s a Friday, we grab a cold beer (or lemon squash for the kids) and watch something silly on TV. Honestly, anything crunchy on the side is a hit. Occasionally, I get fancy and add a quick pico de gallo or pickled onions, but only if the mood strikes.
Pro Tips I Learned (Sometimes The Hard Way)
- Don’t rush the toasting step. I once cranked the heat to “get it done faster” and just got burnt tortillas and a cold middle. Medium and patience wins here.
- Use enough oil, but not too much—otherwise, it’ll get greasy. Actually, I find a spray or brushing works better than pouring it in.
- The fresher the tortillas, the easier they are to fold. Old ones just crack. Ask me how I know.
Questions I Actually Get (And My Real Answers)
- Can I prep these ahead? You can prep the fillings, but don’t assemble till you’re ready to toast, or they go a bit soggy. Learnt that the hard way.
- Can I make them vegetarian? Absolutely—use beans, lentils, or meatless crumbles (I like black beans with a smoky chipotle hit, personally).
- What’s the best cheese? Use whatever melts, honestly. Cheddar, Monterey Jack, even a bit of mozzarella if that’s lurking in your fridge. Just not blue cheese—did that once, never again.
- Help, my crunch wrap won’t stay shut! Don’t stress. Stick it seam-side down in the pan first, and the heat kind of seals it. If it leaks, just eat it faster (kidding… sort of).
- Can I freeze them? Eh, I wouldn’t. It’s not bad, but the texture gets a bit odd. Up to you though!
Well, if you’ve made it this far (and haven’t run screaming from my ramblings), you’re more than ready to tackle your own Homemade Crunch Wrap Supreme. And if you mess up? Just call it “deconstructed”—that’s what the cool chefs do, right?
Ingredients
- 1 lb ground beef
- 1 packet taco seasoning
- 4 large flour tortillas (burrito size)
- 4 small tostada shells
- 1 cup nacho cheese sauce
- 1 cup shredded lettuce
- 1 medium tomato, diced
- 1 cup shredded cheddar cheese
- 1/2 cup sour cream
- 1 tablespoon vegetable oil
Instructions
-
1In a skillet over medium heat, cook the ground beef until browned. Drain excess fat, then stir in taco seasoning and a splash of water. Simmer for 2-3 minutes until well combined.
-
2Warm the flour tortillas in the microwave for 20 seconds to make them pliable. Lay each tortilla flat and spread 1/4 cup of nacho cheese sauce in the center.
-
3Add a quarter of the seasoned beef on top of the cheese sauce, then place a tostada shell over the beef. Layer with shredded lettuce, diced tomato, shredded cheddar cheese, and a dollop of sour cream.
-
4Fold the edges of the tortilla up and over the center, creating pleats to fully enclose the filling. Press gently to seal.
-
5Heat vegetable oil in a large skillet over medium heat. Place each crunch wrap seam-side down and cook for 2-3 minutes per side, or until golden brown and crispy.
-
6Remove from skillet, slice in half, and serve hot.
Approximate Information for One Serving
Nutrition Disclaimers
Number of total servings shown is approximate. Actual number of servings will depend on your preferred portion sizes.
Nutritional values shown are general guidelines and reflect information for 1 serving using the ingredients listed, not including any optional ingredients. Actual macros may vary slightly depending on specific brands and types of ingredients used.
To determine the weight of one serving, prepare the recipe as instructed. Weigh the finished recipe, then divide the weight of the finished recipe (not including the weight of the container the food is in) by the desired number of servings. Result will be the weight of one serving.
Did you make this recipe?
Please consider Pinning it!!


