
Let’s Talk About Banana Pudding (and My Sweet Tooth)
Okay, so confession time: I have a total soft spot for that famous banana pudding from Magnolia Bakery in NYC. If you’ve never stood in line for a cup of the stuff, you haven’t lived—well, maybe you’ve just lived a little less sweetly. But after a few too many subway rides and probably one too many calories, I decided to whip up my own version at home. Honestly, I think it’s even better, and my brother (who’s brutally honest) actually agrees. Plus, you don’t have to wear pants to make this. I mean, that’s a win in my book.
Why You’ll Love This Banana Pudding
I make this whenever I want to impress people but also, you know, keep them comfortable. It’s like my not-so-secret weapon at family gatherings. My kids dive in before it’s even set half the time (I’d lie and say I stop them, but really, who am I kidding?). And it’s just as great the next day—maybe better, if you ask me. Sometimes, though, I get impatient and eat it right out of the bowl, which is probably not what Magnolia intended but hey, this is real life!
What You’ll Need (Substitutions Welcome!)
- 1 box (about 5.1oz) instant vanilla pudding mix (I’ve used banana flavor in a pinch, and it’s surprisingly good—don’t tell my grandma)
- 2 cups cold milk (whole is best, but I’ve used 2% and nobody noticed; almond milk didn’t work, but maybe I did it wrong?)
- 1 can (14oz) sweetened condensed milk (Eagle Brand is what my aunt swears by, but honestly, store brand usually works fine)
- 3 cups heavy whipping cream (sometimes I get the pre-whipped kind when I’m lazy, but it’s not quite the same)
- 1 box Nilla Wafers (or, weird hack: those Lotus Biscoff cookies, if you want some extra spice)
- 4-5 bananas, just-ripe (not green, not brown—though if you only have spotty bananas, it’s totally fine. The pudding just gets a little sweeter)
- Pinch of salt (I actually started doing this after reading Sally’s Baking Addiction—it really makes a difference)
How to Actually Make It (Don’t Stress)
- Mix the pudding: Grab a big bowl (I always pick one that’s a little too small, don’t be like me). Whisk together your instant pudding and cold milk until it’s thick. About 2 minutes. If it looks lumpy, just keep going—it’ll smooth out… probably.
- Add condensed milk: Pour in that sweetened condensed milk and a pinch of salt. Whisk again. This is where I usually sneak a taste, just saying.
- Whip the cream: In a separate bowl (or a stand mixer if you’re fancy), whip up the heavy cream until you get soft peaks. Or, if you’re like me on a Tuesday, use a hand mixer and take a break halfway through because your arm’s tired.
- Fold together: Gently fold the whipped cream into the pudding mixture. Don’t worry if it’s not totally uniform—swirls are pretty. This step actually matters more than I realized, so don’t just dump it in and stir like mad (I’ve learned the hard way).
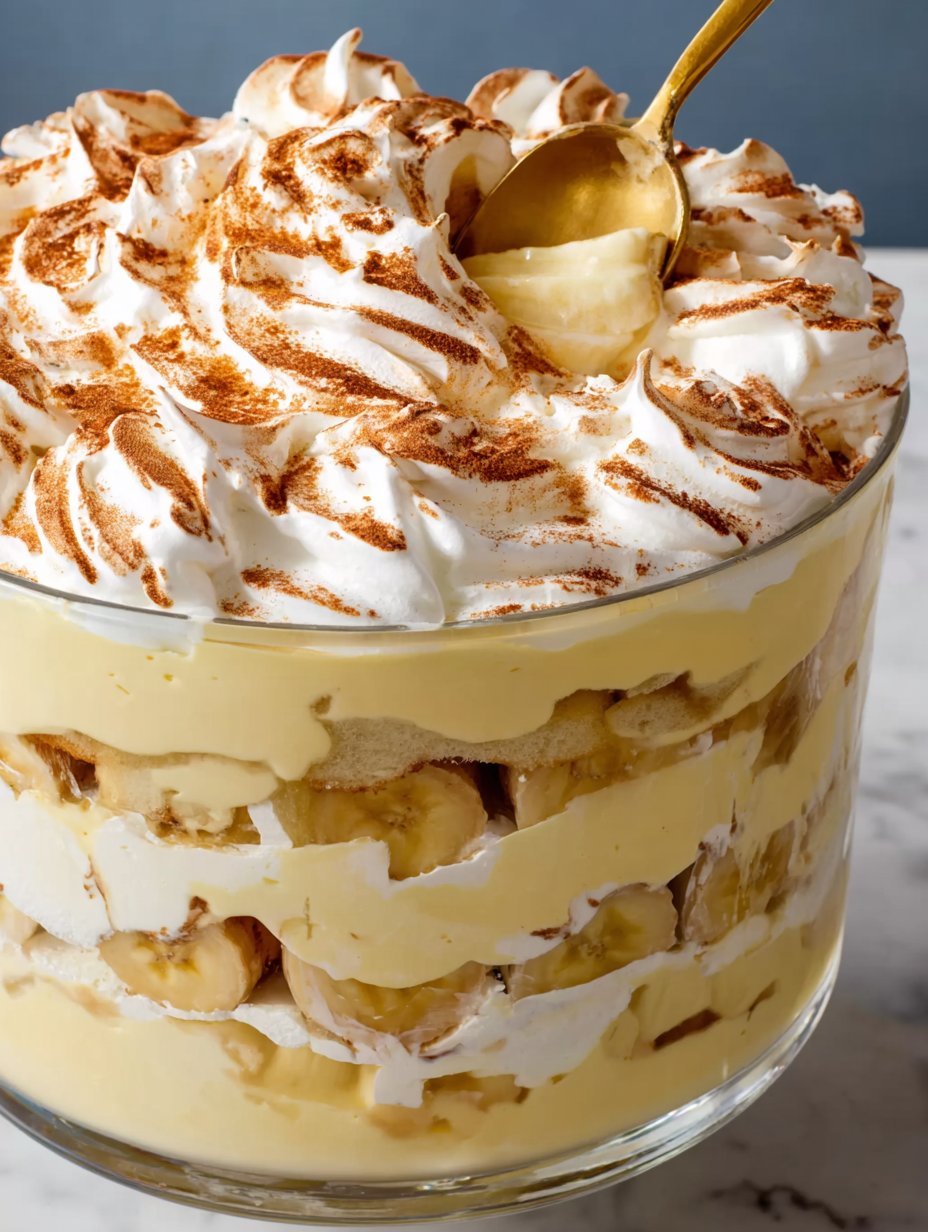
- Layer up: In a big glass dish, start with a layer of Nilla wafers, followed by banana slices, then pudding. Repeat until you run out or the dish is full (I always end with pudding on top, but do your thing).
- Chill: Cover and refrigerate at least 4 hours, but overnight is best if you can wait (I mostly can’t). The cookies will get all soft and dreamy.
- Optional: decorate with extra bananas or crushed wafers on top. But sometimes I just eat it right out of the bowl and skip the pretty part.
Notes From My Kitchen (A Few Happy Accidents)
- If you overwhip the cream, just add a splash of milk. Saves the day.
- Once I forgot the salt and it was a bit flat. Don’t skip it if you can help it.
- Try not to use green bananas—they don’t soften up, and nobody wants crunchy pudding (well, maybe my weird cousin, but not me).
- If you don’t have a large glass dish, mason jars or old mugs work. Not as Instagrammable, but who cares?
Some Variations I’ve Tried (And One I Regret)
- Use Biscoff or graham crackers instead of Nilla Wafers. Changes the vibe, but pretty tasty.
- Stir a spoonful of peanut butter into the pudding before layering—it’s wild, but kind of delicious (I only did this once, but it lives rent-free in my head).
- Tried adding chocolate chips. Didn’t love it. Maybe you will?
- Layer with strawberries if you’re feeling fancy—tastes like summer on a plate.
What If I Don’t Have All the Equipment?
If you don’t have a mixer, just use a whisk and some elbow grease for the cream. I once used a fork. My hand nearly fell off, but it worked. Don’t let tools boss you around.
Storing It (If There’s Any Left!)
Cover and refrigerate; it keeps for up to 3 days, but honestly, in my house it’s a miracle if it lasts past breakfast the next day. Bananas get a little brown after 2 days, but the flavor gets even better. If you’re planning to make ahead, maybe add the last layer of bananas right before serving—just a thought.
How I Like to Serve It (And Family Quirks)
We usually scoop it into big bowls and eat it in front of a movie. Sometimes I top mine with an extra handful of crushed wafers and a tiny pinch of Maldon salt (I know, a little posh, but trust me). On birthdays, my mum always adds a dollop of whipped cream and a candle—don’t ask me why, but it’s tradition now.
Pro Tips (a.k.a. My Mishaps)
- Don’t rush the chilling time. I once tried serving it after 30 minutes—big mistake. The cookies were basically rocks.
- If you make this when it’s super humid, the wafers get soggy faster. Not sure why, but I just roll with it.
- And oh, always taste as you go. Just maybe not so much you run out of pudding for the actual dish (been there, done that…)
FAQ (Actual Texts from Friends and My Sister)
- Can I use regular pudding instead of instant? Technically yes, but it won’t set up the same way. I did it once and it was more like soup.
- How do you keep the bananas from browning? You can toss them in a little lemon juice, but honestly, I don’t bother most times. They get eaten quick.
- Is this gluten-free? Not as written, but you can use gluten-free vanilla cookies. My friend swears by the Kinnikinnick brand (this one).
- Can I make it ahead? Absolutely! Actually, I think it tastes better the next day (if you resist eating it all first)
- Can I freeze it? On second thought, I wouldn’t. The texture goes a bit weird. But if you do, let me know how it turns out!
Okay, that’s it—my not-so-secret, possibly better than Magnolia Bakery banana pudding. If you actually try this, let me know! Or send a pic, unless it’s already half gone by the time you remember (that’s what usually happens to me).
Ingredients
- 1 (14 oz) can sweetened condensed milk
- 1 1/2 cups cold water
- 1 (3.4 oz) package instant vanilla pudding mix
- 3 cups heavy whipping cream
- 1 (12 oz) box vanilla wafers
- 4 large ripe bananas, sliced
- 1 teaspoon pure vanilla extract
- Pinch of salt
Instructions
-
1In a large mixing bowl, whisk together the sweetened condensed milk and cold water until well combined. Add the instant vanilla pudding mix and whisk for about 2 minutes until smooth. Cover and refrigerate for at least 4 hours or overnight.
-
2In a separate bowl, whip the heavy cream with vanilla extract and a pinch of salt until stiff peaks form.
-
3Gently fold the whipped cream into the chilled pudding mixture until fully incorporated and smooth.
-
4In a large trifle dish or glass bowl, layer one-third of the vanilla wafers, followed by one-third of the banana slices, and then one-third of the pudding mixture. Repeat the layers two more times, finishing with a layer of pudding on top.
-
5Cover and refrigerate the assembled pudding for at least 4 hours to allow the flavors to meld and the wafers to soften.
-
6Serve chilled, garnished with extra banana slices or crushed vanilla wafers if desired.
Approximate Information for One Serving
Nutrition Disclaimers
Number of total servings shown is approximate. Actual number of servings will depend on your preferred portion sizes.
Nutritional values shown are general guidelines and reflect information for 1 serving using the ingredients listed, not including any optional ingredients. Actual macros may vary slightly depending on specific brands and types of ingredients used.
To determine the weight of one serving, prepare the recipe as instructed. Weigh the finished recipe, then divide the weight of the finished recipe (not including the weight of the container the food is in) by the desired number of servings. Result will be the weight of one serving.
Did you make this recipe?
Please consider Pinning it!!


