
Okay, Let’s Talk Fro-Yo Fruit Bites
I have to admit—when I first made these Fro-Yo Fruit Bites, I was just trying to trick my nephew into eating something that wasn’t 90% sugar and 10% blue food coloring. But joke’s on me, because I ended up loving them just as much as he did. There’s something about the combo of creamy yogurt and juicy fruit that just feels like summer, even if it’s raining sideways outside (thanks, British weather).
Honestly, the first time I made these, I dropped half the yogurt on the counter. Still tastes good, though. And if you’re the sort who likes a little snack while binge-watching that latest crime doc, these are perfect; bite-sized and not at all messy (unless you count the yogurt incident—never mind that).
Why You’ll Love This (Or at Least, Why I Do)
I make these Fro-Yo Fruit Bites when I’ve got sad-looking berries in the fridge or just need a quick pick-me-up that isn’t, you know, a massive slice of cake. My family goes a bit mad for them, especially when I sneak in a drizzle of honey. I’ve learned the hard way that if you use those fancy silicone molds, it’s much easier to pop them out (I once tried to use an ice tray and… well, let’s just say I had more of a Fro-Yo Fruit Crumble situation).
Plus, these are ideal for those days when the kitchen’s too hot to even think about turning on the oven. (Also, not having to bake means less waiting, which is brilliant for impatient snackers like me.)
What You’ll Need (With My Usual Substitutions)
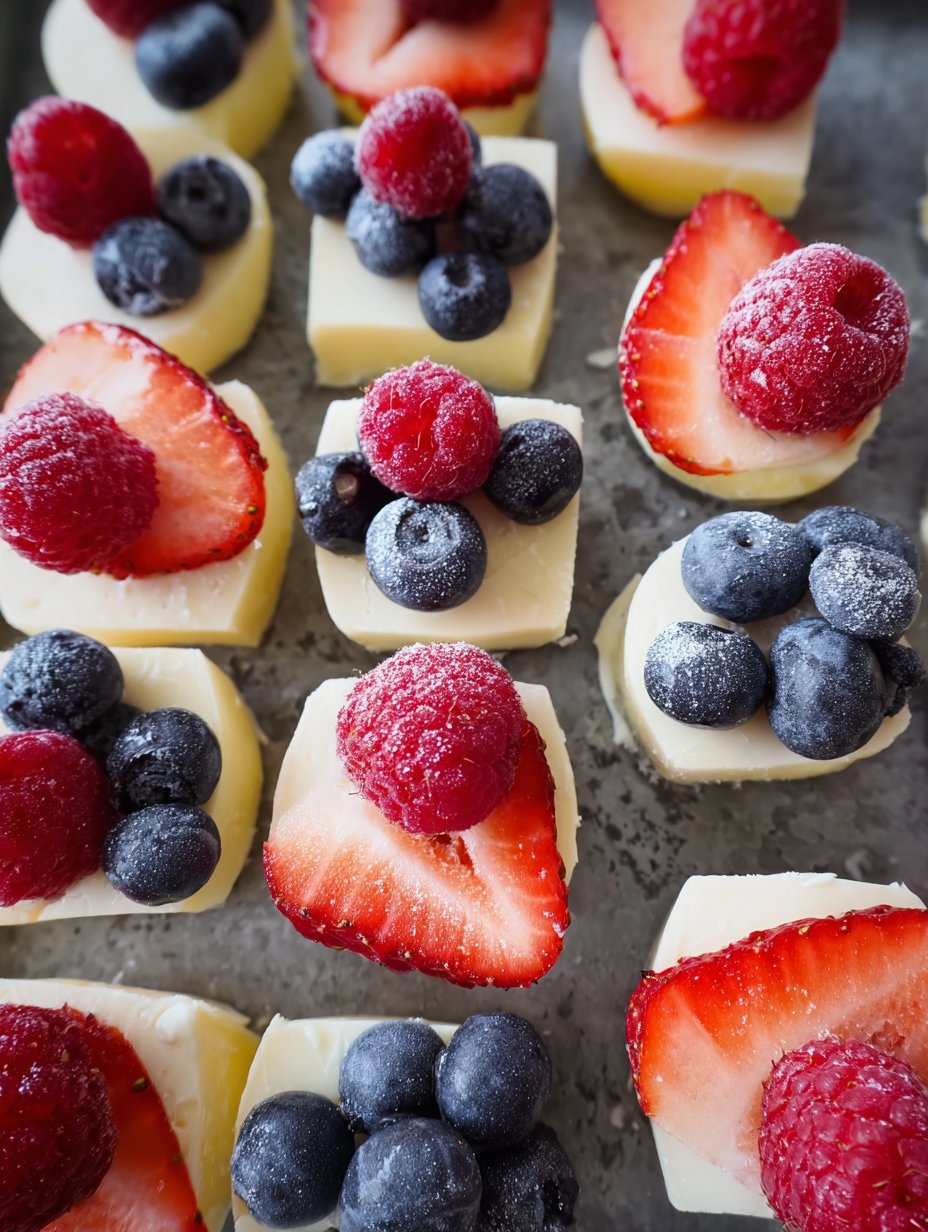
- Greek yogurt (plain, or vanilla for a bit more sweetness—I sometimes use coconut yogurt if I’m feeling fancy or just ran out of the other kind)
- A handful (about 1 cup, if you want to be precise) of mixed berries—strawberries, blueberries, raspberries. Blackberries too, but pick out the tough bits!
- 1-2 teaspoons honey or maple syrup (sometimes I just skip this, especially if the fruit is sweet)
- Optional: a sprinkle of granola (I sometimes use crushed up oat biscuits when I’ve got no granola left—my grandmother used to swear by Hobnobs, but honestly, anything crunchy works)
- Pinch of chia seeds or flax if you’re feeling healthy (totally optional—I forget this step half the time)
How to Do It (And A Bit of Winging It)
- Prep your fruit: Give your berries a quick wash. Chop up anything bigger than a marble. I usually sneak a few at this stage. (Quality control, right?)
- Mix the yogurt: In a bowl, stir your yogurt with honey or maple syrup if you’re using it. Sometimes I just tip the honey straight in and don’t bother measuring—never hurt anyone.
- Spoon and layer: Drop a little blob of yogurt into each section of your silicone mold or mini muffin tin (if you don’t have one, just line a baking tray with parchment and make rustic clusters). Add a few bits of fruit to each, then a bit more yogurt on top. Swirl it a bit if you fancy.
- Add the crunch: Sprinkle granola, oat biscuits, or whatever crunchy thing you’re using on top. If you remembered the chia seeds, chuck them in too.
- Freeze: Pop the whole tray in the freezer for about 2-3 hours, or until they’re solid. This is the bit where I usually forget about them for a while—don’t worry, they won’t mind.
- Pop out and enjoy: Use a butter knife to pop them out if they’re stubborn—or just flex the silicone tray. Don’t stress if they look a little odd; they always taste good.
Things I’ve Learned (The Hard Way)
- Don’t overfill the molds—otherwise, you get one massive frozen blob instead of cute bites (unless that’s what you’re after, in which case, you do you).
- Greek yogurt works best for creaminess, but thinner yogurts will do in a pinch; they just get a bit icier.
- Sometimes I forget the honey, and honestly, you probably won’t notice if the fruit’s ripe.
Ways I’ve Messed With This (And Sometimes Messed It Up)
- Swapped berries for chopped mango, which is lush; kiwi was a bit too tart, but maybe that’s just me.
- Did a layer of peanut butter once—delicious, but froze like a rock. Had to let them thaw a bit before eating.
- Used chocolate chips, which the kids loved. Too many, though, and it’s basically dessert instead of a snack. (But sometimes that’s the vibe!)
What If You Don’t Have a Silicone Mold?
Honestly, I used to say it was essential, but you can just drop little mounds on baking paper on a tray—might be a bit wonky, but they’ll taste grand. Muffin tins work too, though getting them out can be a faff. Or use mini cupcake liners if you’ve got those hiding in a drawer somewhere.
How to Store (If They Last, Which They Don’t in My House)
Just stick them in a tub with a lid, and keep them in the freezer. If you stack them, put baking paper between layers so they don’t weld together. But honestly, they’ve never lasted more than a day or two in our house—someone always raids the freezer.
How We Serve Them (And My Favourite Way)
Great straight from the freezer, though if you wait a minute they soften up a bit. I sometimes put a few in a little cup and eat them while watering the garden (multitasking!). My niece loves them with a drizzle of melted chocolate—makes them extra special.
If I Could Give My Past Self One Pro Tip…
I once tried to rush the freezing and took them out after an hour—don’t do that unless you want yogurt goo everywhere. Actually, I find they taste better the next day when they’ve mellowed out a bit, but that could just be me.
Questions I’ve Actually Been Asked
- Can I use non-dairy yogurt? Absolutely! I like coconut yogurt, but almond works too—might freeze a bit icier, is all.
- Do I have to use berries? Nope—try chopped peaches, or even pineapple. Just avoid anything too watery or it gets a bit icy.
- How long do they keep? Officially, up to two weeks in the freezer. Unofficially, they’re gone much quicker, at least here.
- Can I make these with kids? Yes! They’re perfect for little hands, and if you don’t mind a bit of a mess, it’s actually good fun. (Pro tip: put down a tea towel first.)
- Where do you get your silicone molds? I got mine here at Lakeland, but you can find loads on Amazon too. Don’t overthink it—any small-ish tray works fine.
Oh—almost forgot. If you’re after more easy freezer snacks, check out BBC Good Food’s frozen yogurt bark—it’s super flexible and a bit of a crowd-pleaser.
So, that’s it. Fro-Yo Fruit Bites: easy, cheerful, and just a little bit unpredictable. Kind of like my family, now I think about it.
Ingredients
- 1 cup plain Greek yogurt
- 2 tablespoons honey or maple syrup
- 1/2 cup strawberries, diced
- 1/2 cup blueberries
- 1/2 cup kiwi, peeled and diced
- 1/2 cup mango, diced
- 1/4 cup granola
- 1 teaspoon vanilla extract
Instructions
-
1Line a mini muffin tin with paper liners or use a silicone mold for easy removal.
-
2In a medium bowl, mix the Greek yogurt, honey, and vanilla extract until smooth.
-
3Spoon about 1 tablespoon of the yogurt mixture into each muffin cup or mold.
-
4Top each with a mix of diced strawberries, blueberries, kiwi, and mango.
-
5Sprinkle a little granola over the fruit for added crunch.
-
6Freeze for at least 2 hours or until completely firm. Remove from molds and enjoy immediately.
Approximate Information for One Serving
Nutrition Disclaimers
Number of total servings shown is approximate. Actual number of servings will depend on your preferred portion sizes.
Nutritional values shown are general guidelines and reflect information for 1 serving using the ingredients listed, not including any optional ingredients. Actual macros may vary slightly depending on specific brands and types of ingredients used.
To determine the weight of one serving, prepare the recipe as instructed. Weigh the finished recipe, then divide the weight of the finished recipe (not including the weight of the container the food is in) by the desired number of servings. Result will be the weight of one serving.
Did you make this recipe?
Please consider Pinning it!!


