
Let Me Tell You About This Frozen Yogurt Bark
Alright, so quick confession—I didn’t even know yogurt bark existed until a friend brought some over to a picnic a couple summers back. We were all sweating buckets and she just plopped out this tray of what looked like a fancy, edible mosaic on her cooler. Anyway, now it’s sort of my go-to thing when I want to feel a little fancy, but also can’t be bothered to turn on the oven (especially in July). Kids love it; adults pretend they made it themselves. It’s a win-win, really.
Oh—and once, I dropped half the batch on the floor in my excitement to taste it. Five-second rule? Let’s just say my standards for kitchen cleanliness are flexible in summer.
Why You’ll End Up Making This All Summer
I make this when I just can’t face another hot stove day, or I need something sweet but not too much of a faff. My family goes bonkers for it because it’s cold (and who doesn’t want that in August?), plus there’s always a bit of a scramble for the piece with the most berries. I’ll admit, the first time I tried it, I made a right mess—yogurt everywhere except the tray, ha! But, even those accidental clumps tasted pretty great, so it’s all good. If you’ve ever tried to sneak treats into a lunchbox without them melting into oblivion, you get me.
What You’ll Need (And How I Sometimes Wing It)
- 2 cups thick Greek yogurt (I use full-fat when I’m feeling indulgent, but honestly, any yogurt does the trick. My grandma swore by Fage, but I’ve used Lidl’s own and survived.)
- 2-3 tbsp honey or maple syrup (Or just a big glug. Sometimes I use agave, but I can’t always find it in my local shop.)
- 1 tsp vanilla extract (Totally optional—I once forgot it entirely and nobody noticed.)
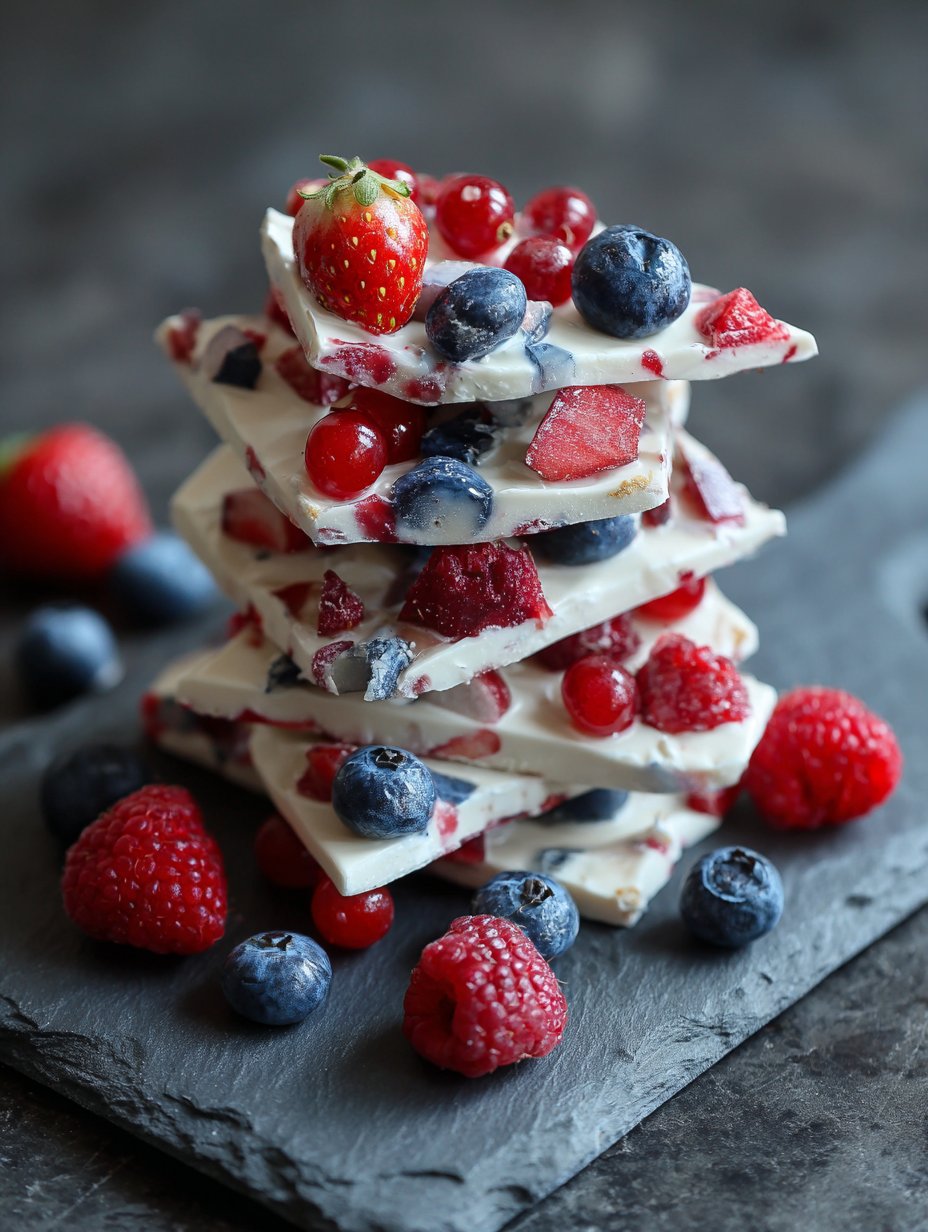
- 1 to 1 1/2 cups mixed berries (Blueberries, raspberries, strawberries, or whatever’s lurking at the back of your fridge/freezer. And, frozen berries hold up fine; I’ve done both.)
- A handful of chopped nuts (Pistachios, almonds, cashews—whatever’s around. Or skip them if you’re not a nut person.)
- 2 tbsp dark chocolate chips or shavings (This part is entirely optional, but honestly, why not?)
How I Throw It Together (With a Few Honest Blunders)
- Line a baking tray (ideally about 9×13 inches, but anything flat-ish works) with parchment paper. Don’t skip this, or you’ll be chiseling yogurt off the tray until next week.
- In a bowl, mix your yogurt, honey, and vanilla. This is where I usually sneak a taste and sometimes add more sweetener (because, well, life is short).
- Spread the yogurt in a layer about as thick as your pinky finger—don’t stress about precision here. If it looks lumpy, that’s normal. Actually, I find it works better if you don’t fuss with it too much.
- Scatter your berries over the top. Sometimes I press them in a bit so they don’t all fall off later. Throw on your nuts and chocolate, if using. Don’t worry if it looks like chaos—that’s half the fun.
- Pop the tray into the freezer (on a flat shelf, trust me). Leave it for at least 3 hours, or overnight if you have the patience (I almost never do).
- Once it’s set, lift the bark out using the parchment (it’ll probably crack a bit, but that’s part of its charm). Break or cut into pieces. Eat straight away or stash for later. Or, just stand at the counter and munch—your call.
Things I’ve Learned the Hard Way (Notes)
- If your yogurt is really runny, it turns more into frozen yogurt slush, which is still tasty but a nightmare to break up.
- Don’t use too much honey—it gets kind of icy when frozen. I probably go a bit lighter than most recipes say.
- Let it sit out for 2-3 minutes before you try to slice it. Unless you’ve got arms like a lumberjack, then go wild.
Variations I’ve Tried (Some Winners, Some… Not So Much)
- Swapped the berries for chopped mango and coconut—my neighbour called it ‘tropical chaos’ but ate the lot.
- I once tried adding granola before freezing, thinking it’d be crunchy. Spoiler: it turned soggy. Wouldn’t recommend.
- Peanut butter swirled in is surprisingly good, but only if you don’t mind a bit of salty with your sweet.
What You’ll Need (And If You Don’t Have It…)
- Baking tray or sheet pan (or a big plate lined with foil if you’re desperate—it works, just smaller pieces)
- Parchment paper (don’t have any? I once used cling film; didn’t love it, but it peeled off okay in a pinch)
- Spoon or spatula (my friend uses her hands—fair play, but it’s messy)
How to Store It (If You Even Get That Far)
Keep your bark in a freezer bag or lidded container. It’s supposed to last a week, but honestly, in my house it never makes it past the next day. Someone always finds my stash. If you want to be sneaky, hide it behind the frozen peas—kids never look there.
How I Like to Serve It (And My Family’s Odd Ritual)
Usually, I break it into big jagged chunks and pile it on a plate for people to grab at. My sister-in-law dips hers in extra honey, which is a bit over the top (but secretly delicious). Sometimes, I’ll drizzle a smidge more chocolate over the top just before serving. Or, if it’s breakfast, I put a chunk on top of hot oats—that was a happy accident, but I stand by it!
Things I Wish I’d Known: Pro Tips
- I once tried rushing the freezing step—big mistake, just ended up with weird half-goopy yogurt. Totally not worth it.
- Don’t skimp on the parchment, trust me. The one time I did, I spent ages scraping bark off the tray (and muttering under my breath).
- If you use frozen berries, toss them in a bowl first so they don’t stick together in a giant berry lump.
Questions I Actually Get Asked All the Time
- Can I use flavored yogurt? Absolutely, but it’ll be sweeter (sometimes a bit too sweet for me, but hey, you do you). Just watch out for ones with gelatine—they freeze a bit funny.
- Does this work with dairy-free yogurt? For sure! I’ve done it with coconut yogurt and it holds up fine. The texture’s just a bit silkier, in a good way.
- Help, my bark is too hard to cut! Oh, I’ve been there. Just leave it out for a minute or two. Or whack it on the counter (gently, I guess). Sometimes I just snap it with my hands.
- Can I make this ahead for a party? Yep! But if it’s a scorcher outside, serve it right away or it’ll melt into a puddle. Learned that one the sticky way at a BBQ last year.
- Where do you get those fancy sprinkles I see online? Honestly, I just get mine from the supermarket, but if you want to get fancy, check out Baking Mad or Lakeland. They’ve got all sorts of bits and bobs.
Side note, while I’m thinking about it: has anyone else noticed that yogurt always disappears faster than you can buy it? Maybe it’s just my house, but I swear there’s a yogurt gremlin at work. Anyway, if you give this a go, let me know how it goes—or what wild combinations you come up with. I’m always up for new snack ideas (as long as I don’t have to clean up too much after).
Ingredients
- 2 cups plain Greek yogurt
- 2 tablespoons honey
- 1 teaspoon vanilla extract
- 1/2 cup fresh strawberries, sliced
- 1/2 cup fresh blueberries
- 1/4 cup fresh raspberries
- 2 tablespoons chopped pistachios
- 2 tablespoons mini dark chocolate chips
Instructions
-
1Line a baking sheet with parchment paper.
-
2In a medium bowl, mix Greek yogurt, honey, and vanilla extract until well combined.
-
3Spread the yogurt mixture evenly onto the prepared baking sheet to about 1/4-inch thickness.
-
4Scatter sliced strawberries, blueberries, raspberries, chopped pistachios, and mini dark chocolate chips evenly over the yogurt.
-
5Freeze for at least 4 hours, or until completely firm.
-
6Break the frozen yogurt bark into pieces and serve immediately. Store leftovers in an airtight container in the freezer.
Approximate Information for One Serving
Nutrition Disclaimers
Number of total servings shown is approximate. Actual number of servings will depend on your preferred portion sizes.
Nutritional values shown are general guidelines and reflect information for 1 serving using the ingredients listed, not including any optional ingredients. Actual macros may vary slightly depending on specific brands and types of ingredients used.
To determine the weight of one serving, prepare the recipe as instructed. Weigh the finished recipe, then divide the weight of the finished recipe (not including the weight of the container the food is in) by the desired number of servings. Result will be the weight of one serving.
Did you make this recipe?
Please consider Pinning it!!


