Let Me Tell You About This Tomato Galette
Oh, this galette. I stumbled into making it one late August when my neighbor kept leaving bags of tomatoes on my porch (like, thanks, but also, what am I supposed to do with all these?!). I’d seen fancy folks on TV making galettes like it’s child’s play, but for the longest time I thought, eh, that looks too fussy. But you know what? Turns out it’s even less trouble than a proper pie. I remember my first attempt—I dropped half the filling on the floor. Still tasted good though. If you’ve got some tomatoes rolling around and a bit of butter in the fridge, you’re basically halfway there. Oh, and if you’re worried about making the dough, don’t be. It’s rustic, which really means: it’s okay if it comes out a bit wonky. That’s part of the charm, right?
Why You’ll Love This (or, Why I Keep Making It)
I make this when I want dinner to feel special but I can’t be bothered with anything too precise. My family goes a bit bonkers for it because the edges get all crispy and, honestly, it looks like I worked way harder than I did (don’t tell them). It’s also a winner if you’re tired of yet another tomato salad (nothing against salads! just, you know, variety is the spice of life). One time I forgot to chill the dough and it still worked, sort of. Just a bit less flaky. Plus, it’s a good excuse to use up whatever cheese is lurking in the back of the fridge.
Grab These Ingredients (or Whatever’s Close Enough)
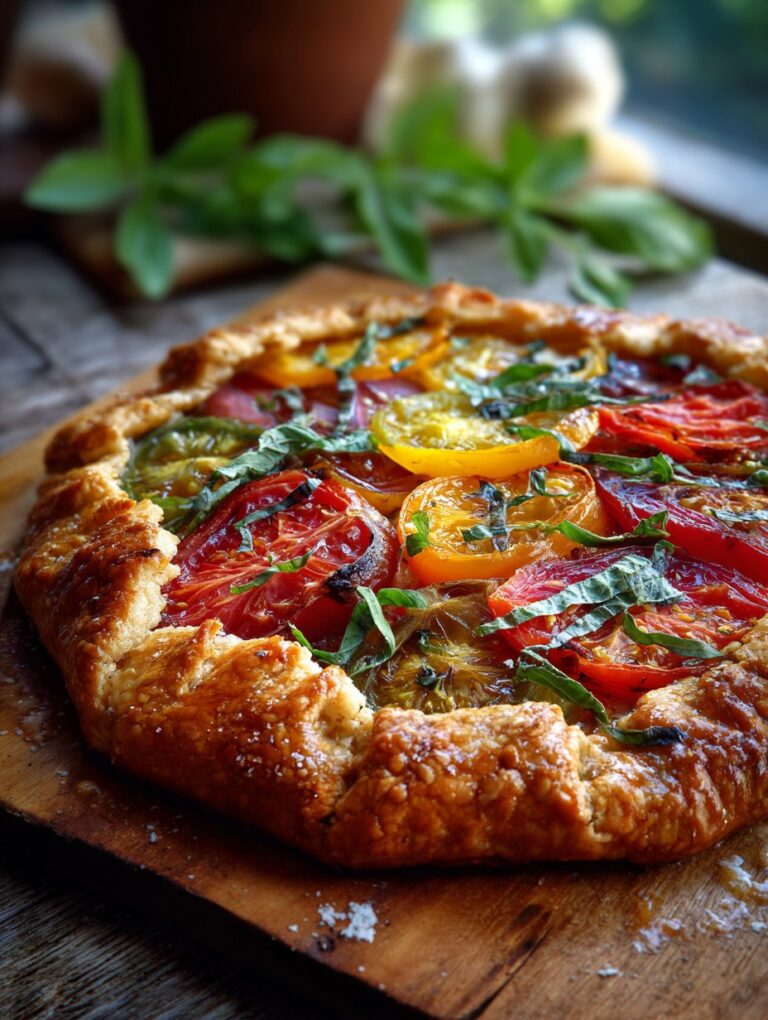
- About 5-6 small to medium heirloom tomatoes, sliced (I’ve swapped in big, juicy regular tomatoes before when that’s all I had—still tasty)
- 1/2 tsp sea salt, plus more for sprinkling (Maldon is fancy, but I’ve used table salt many times)
- 2 cups all-purpose flour (my granny insisted on King Arthur, but store brand works fine)
- 3/4 cup cold unsalted butter, cut into cubes (sometimes I use salted, just dial back the extra salt)
- 1/3 cup ice water, maybe a touch more if the dough looks too dry
- 1 tbsp apple cider vinegar (some folks use lemon juice—I forget which I used last time, but it was still good)
- 1 cup shredded cheese—cheddar, Gruyère, or mozzarella are all fine (I once used feta, but my kids gave me the side-eye)
- 2 tbsp Dijon mustard (optional, but it wakes everything up)
- Fresh herbs: basil, thyme, or oregano (I just grab whatever’s growing out back, or skip it if I forget)
- 1 egg, beaten, for brushing (but sometimes I just use a bit of milk)
- black pepper to taste
How to Make It—Just Go With the Flow
- First, make the dough: In a big bowl, toss together the flour and salt. Add the cold butter, and squish it in with your fingers (or use a pastry cutter if you’re feeling proper) until it looks like chunky sand. I usually sneak a taste here, though I’m not sure why. Stir in the vinegar and water bit by bit, just until it mostly sticks together. If it looks more like a pile of gravel than a dough, add a splash more water. Gather it up, wrap it in cling wrap, and chill for at least 30 minutes. Or, hey, if you’re in a rush—pop it in the freezer for 15. I won’t tell.
- Prep the tomatoes: Lay out the slices on some paper towels and sprinkle with a little salt. This helps draw out moisture so your galette isn’t a soggy mess. Let them hang out for 15 minutes (I scroll social media here).
- Roll and fill: Set the oven to 400°F (about 200°C). On a floured surface, roll the dough out into a rough circle, about 12 inches wide. Don’t stress if it’s not perfectly round. Plop it onto a parchment-lined baking sheet. Spread the Dijon over the center, leaving about 2 inches bare round the edge. Sprinkle on your cheese and herbs. Layer on the tomatoes in whatever pattern you fancy—overlapping is good. Season with pepper and maybe a bit more salt.
- Fold and bake: Fold the edges over the tomatoes. It’ll look rustic. That’s the whole vibe. Brush the crust with the egg (or milk). Bake for 40–45 minutes, until the crust is golden and the tomatoes look a bit jammy at the edges. (If some cheese leaks out, that’s normal—and actually my favorite part.)
- Cool and serve: Let it rest for 10–15 minutes before slicing. Or don’t, if you’re impatient. I’ve burned my mouth plenty.
Stuff I’ve Learned (Notes)
- Don’t skip salting the tomatoes—it really does keep things from going soupy.
- I’ve tried making the dough in a food processor; actually, I find it works better if you do it by hand because it’s less easy to overmix.
- A sprinkle of cornmeal under the dough helps lift it off the tray, but I forget about half the time and it’s still fine.
- Don’t stress if it cracks a bit. Patch it with extra dough or just call it “rustic.”
Variations I’ve Tried (Some Worked, Some… Eh)
- Cheese swap: Goat cheese is delish, but once I tried blue cheese and, well, not my thing. Maybe you’ll love it.
- Veggies: I’ve layered in zucchini slices or sautéed mushrooms. Both are great, as long as you don’t overload the galette.
- Gluten-free: I experimented with almond flour—tasty, but the dough was so crumbly I had to basically press it in by hand. If you want a reliable GF crust, this recipe from Cookie and Kate is pretty solid.
Tools You’ll Need (Or Improvise)
- Baking sheet (I’ve used a pizza stone in a pinch—just line it with parchment)
- Parchment paper (if you don’t have any, a well-floured pan works, but be ready for some sticking)
- Rolling pin—or a wine bottle. I could pretend I always use a proper pin but, honestly, the bottle is usually closer
- Sharp knife (for slicing the tomatoes, and, if you’re like me, for chasing kids out of the kitchen)

Keeping It Fresh: Storage (If There’s Any Left)
This keeps in the fridge for a couple of days, just wrap it up or pop it in a container. I think it tastes better the next day (cold breakfast galette is a thing in my house). Though honestly, in my house it never lasts more than a day!
How I Like to Serve It
We usually eat slices with a big messy green salad and a glass of something cold (ginger beer for the kids, white wine for me). Once, I served this with a fried egg on top and my husband declared it “brunch for dinner”—it kind of was. Also, my mate swears by a dollop of homemade crème fraîche but I’m usually too lazy for that.
Lessons Learned (A Few Pro Tips)
- I once tried rushing the dough by skipping chill time—regretted it because it turned out tough, so, yeah, patience pays.
- Overloading with tomatoes makes it soggy (I’ve done this more than once, oops). Less is more.
- If the crust browns too fast, just tent it with some foil around the edges—learned that form a burnt galette disaster last summer.
Questions Folks Have Actually Asked Me (FAQ)
- Can I use store-bought pie crust? Yep! I’ve done it in a pinch and it’s still fab—though you lose a bit of that handmade pride.
- What if I don’t have heirloom tomatoes? Any ripe tomatoes work, just avoid the rock-hard ones (they taste like, well, nothing).
- Can I freeze this? Hmm, I’ve tried, but honestly it goes a bit mushy after thawing. Maybe okay if you reheat in the oven, but not my favorite.
- Does it have to be round? Ha! Mine never is. Ovals, rough rectangles, even one weird squiggly shape. No one’s checking.
- How do I stop a soggy bottom? Salt the tomatoes, don’t overload the filling, and—actually, on second thought, a thin layer of breadcrumbs under the cheese helps too. I picked up that trick from The Kitchn.
On a totally unrelated note, I once tried adding strawberries to this galette thinking it’d be genius—let’s just say, stick to tomatoes. Happy baking!
Ingredients
- 1 1/4 cups all-purpose flour
- 1/2 cup unsalted butter, cold and cubed
- 1/4 cup ice water
- 1/2 teaspoon sea salt
- 3 large heirloom tomatoes, sliced
- 1/2 cup ricotta cheese
- 1/4 cup grated Parmesan cheese
- 1 tablespoon fresh basil, chopped
- 1 tablespoon olive oil
- Freshly ground black pepper, to taste
Instructions
-
1Preheat the oven to 400°F (200°C). Line a baking sheet with parchment paper.
-
2In a large bowl, combine flour and salt. Cut in the cold butter until the mixture resembles coarse crumbs. Add ice water gradually, mixing until the dough comes together. Shape into a disk, wrap, and chill for 20 minutes.
-
3On a lightly floured surface, roll out the dough into a 12-inch circle. Transfer to the prepared baking sheet.
-
4Spread ricotta cheese over the center of the dough, leaving a 2-inch border. Arrange heirloom tomato slices over the ricotta. Sprinkle with Parmesan, basil, salt, and pepper. Drizzle with olive oil.
-
5Fold the edges of the dough over the filling, pleating as needed. Bake for 40 minutes, or until the crust is golden and the tomatoes are tender.
-
6Cool slightly before slicing. Garnish with extra basil if desired and serve warm or at room temperature.
Approximate Information for One Serving
Nutrition Disclaimers
Number of total servings shown is approximate. Actual number of servings will depend on your preferred portion sizes.
Nutritional values shown are general guidelines and reflect information for 1 serving using the ingredients listed, not including any optional ingredients. Actual macros may vary slightly depending on specific brands and types of ingredients used.
To determine the weight of one serving, prepare the recipe as instructed. Weigh the finished recipe, then divide the weight of the finished recipe (not including the weight of the container the food is in) by the desired number of servings. Result will be the weight of one serving.
Did you make this recipe?
Please consider Pinning it!!


