Let’s Talk About Garlic Lemon Chicken Thighs (Pull Up a Chair)
You know that feeling when you open the fridge and just stare, hoping dinner ideas appear out of thin air? That’s usually me on a Wednesday, peering at some chicken thighs and wondering if I should just order takeaway—again. But honestly, this Garlic Lemon Chicken Thighs recipe sort of rescued me from ‘meh’ weeknight dinners. It reminds me of the first time I tried to impress my neighbor (she’s a proper foodie, no kidding), and the kitchen smelled so good she wandered over before I even texted. We ended up sitting on the porch, devouring chicken and laughing about my rookie mistake of zesting a lemon directly over the open dishwasher. Pro tip: don’t do that, unless you want an oddly citrus-fresh rinse cycle.
Why I Keep Making This (and You Probably Will Too)
I make this when I want something that feels like I put in way more effort than I actually did. The chicken’s always juicy (even when I get distracted scrolling through Serious Eats), and honestly, my family goes bananas for the crispy edges and zingy sauce. My partner claims it’s the only way he actually likes chicken thighs (he’s a bit picky), and my kid calls it ‘lemony magic.’ Sometimes the garlic sticks to the pan, but that’s honestly the best bit to scrape up. If you’ve ever had chicken come out dry or, I hate to say it, bland, this is the recipe that’ll save your dinner reputation. And if you’re having one of those days where nothing goes right, at least you’ll have chicken that does.
What You’ll Need (And a Few Swaps I’ve Tried)
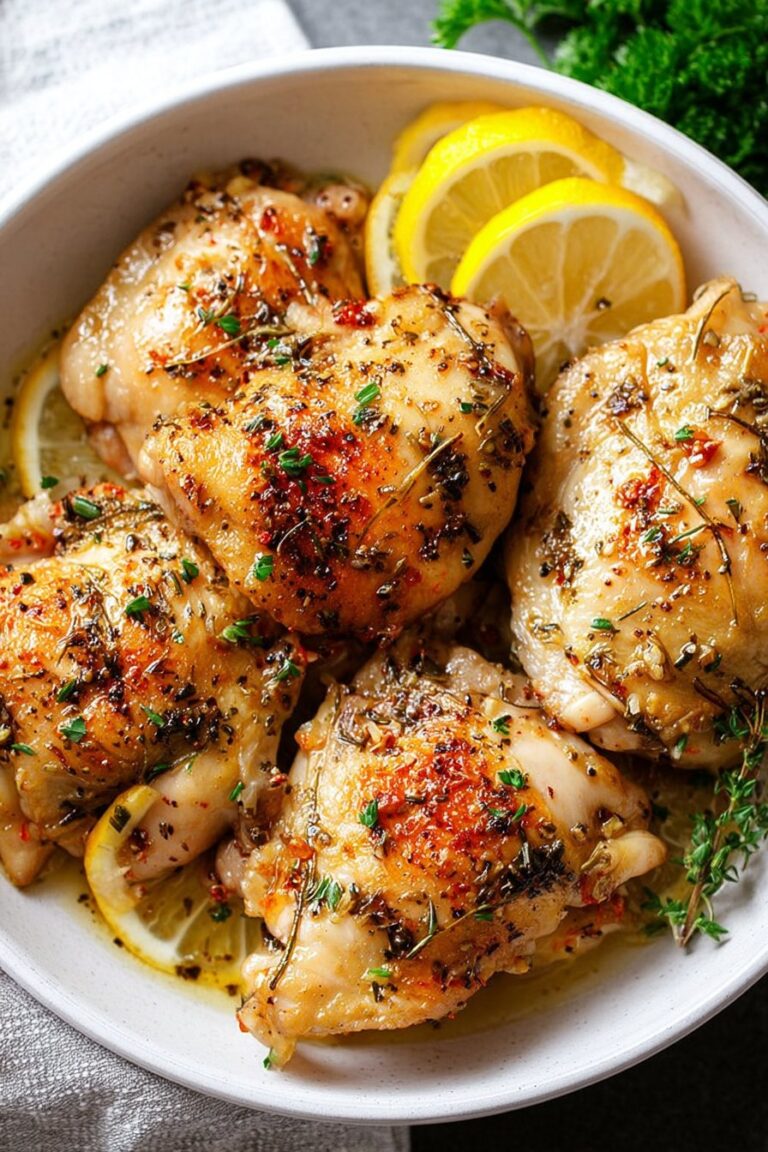
- 6 bone-in, skin-on chicken thighs (skinless is ok if you’re watching the calories, but the skin really crisps up nice)
- 4 cloves garlic, smashed and chopped (I’ve used that pre-chopped stuff in a pinch—don’t tell my grandmother)
- 1 large lemon, zested and juiced (or two smaller ones if that’s what’s rolling around your crisper)
- 2 tablespoons olive oil (I sometimes use melted butter for a richer flavor, and once I even tried coconut oil—wasn’t a fan, honestly)
- 1 teaspoon dried oregano (fresh is lovely but not essential)
- Salt and black pepper to taste
- Optional: a dash of smoked paprika or chili flakes if you like a little bite
My mum always swore by that fancy Maldon sea salt, but I just use whatever’s handy these days. Also, if you run out of lemons, a splash of white wine vinegar works in a pinch, though it’s not quite the same zing.
How to Make It (Winging It Is Allowed)
- Preheat your oven to 425°F (220°C). If you forget, like I do half the time, just pop the chicken in once it’s hot—no big deal.
- Pat the chicken thighs dry with some kitchen towel. (This is where I always realize I’ve run out and end up using a clean tea towel. Works fine!)
- Toss the thighs in a big bowl with olive oil, garlic, lemon zest, half the lemon juice, oregano, salt, and pepper. Get your hands in there—messy is good. This is where I sneak a taste of the marinade, by the way. If it seems too sharp, add a splash more oil.
- Arrange the thighs, skin side up, in a roasting pan or big skillet. (If they look squashed, that’s OK; they’ll shrink a bit.) Pour over any leftover marinade.
- Roast for about 35–40 minutes, or until the skin is crispy and golden and the juices run clear. Sometimes my oven cooks unevenly, so I turn the pan halfway through. Don’t worry if it looks a bit weird at this stage—it always does, but the magic happens at the end.
- Squeeze the rest of the lemon juice over just before serving. If you like, scatter some chopped parsley on top. Or not. Up to you!
Notes (aka Things I Learned the Hard Way)
- Using bone-in thighs really does keep them juicier. I tried boneless once because they were on sale, and it just wasn’t the same.
- If you line your pan with foil, cleaning up is a breeze, but sometimes I just can’t be bothered and soak it overnight instead.
- Leftovers taste even better (if you have any—rare in my house!).
Variations I’ve Messed With (Some Winners, Some Not)
- I’ve thrown in halved baby potatoes to roast under the chicken—soaks up all the lovely juices. Chips are fine, but not quite as good.
- Once, I swapped the lemon for orange. Oddly sweet, not my favorite but the kid didn’t mind.
- If you like it herby, basil or thyme are lovely. But rosemary was a bit much for me—too piney? Maybe I used too much.
Handy Equipment (But Don’t Stress If You Don’t Have It)
- A big roasting tin or ovenproof skillet (but honestly, I’ve done this in a battered cake pan and it worked fine)
- Tongs can help with flipping, but I usually use a fork and a prayer
- Zester or microplane for the lemon—but if you don’t have one, a box grater just about manages (watch your knuckles… trust me)

How to Store (If You Somehow Don’t Eat It All Right Away)
Pack any leftovers into a container and stick them in the fridge. They’ll keep for about 3 days, though honestly, in my house it never lasts more than a day! I actually think it tastes better cold, straight from the fridge, but maybe that’s just me. If you want to reheat, do it gently in the oven or a pan with a splash of water so it stays juicy.
Serving Ideas (What I Like to Plate Up With It)
My go-to is buttery rice or a chunk of crusty bread to mop up the sauce. If I’m feeling healthy (eh, occasionally), I’ll do a quick green salad or roasted broccoli. My family’s a fan of piling everything onto one big platter, then letting everyone grab what they want. Oh, and sometimes I serve it with a dollop of tzatziki if I haven’t forgotten to buy yogurt… again.
Pro Tips (Learn From My Oopsies)
- I once tried rushing the browning step on the stovetop before baking—ended up with pale, sort-of-soggy skin. Not worth it. Let the oven work its magic.
- If you’re tempted to marinate for hours, go ahead, but I’ve found even 20 minutes is fine if you’re in a rush.
- Don’t forget to taste the sauce at the end—sometimes the lemon can be a bit fierce, so go easy if you’re citrus-shy.
FAQ (Because My Friends Always Ask)
- Can I use chicken breasts instead? Sure, but you’ll lose some of that juicy goodness. Thighs are just better for this, trust me. But if it’s all you’ve got, knock yourself out—just cut the cooking time a bit.
- Is this freezer-friendly? I mean, technically yes, but the skin’s never quite as crispy after. I’d eat it fresh if you can.
- What if I don’t have fresh garlic? The jarred minced stuff works fine. Powder in a pinch, but the flavor’s not quite the same. (Don’t panic though!)
- Can I double this recipe? Oh absolutely. Just use a bigger pan. Or two pans. Or, actually, maybe call for backup if your oven’s on the smaller side.
- Do I have to use oregano? Nope, I’ve swapped in Italian seasoning or just left it out. The garlic and lemon do most of the heavy lifting anyway.
If you’re after more super simple (but not boring) weeknight ideas, I’ve found loads of gems at Budget Bytes—worth a peek when you’ve got a minute.
So, there you go—my not-so-fancy but always tasty Garlic Lemon Chicken Thighs. If you give it a go, let me know how it worked for you (or if you ended up staring into the dishwasher, wondering where all your zest went).
Ingredients
- 8 bone-in, skin-on chicken thighs
- 4 cloves garlic, minced
- 2 lemons (1 juiced, 1 sliced)
- 3 tablespoons olive oil
- 1 teaspoon dried oregano
- 1 teaspoon salt
- 1/2 teaspoon black pepper
- 2 tablespoons fresh parsley, chopped
Instructions
-
1Preheat the oven to 400°F (200°C).
-
2In a large bowl, whisk together olive oil, minced garlic, lemon juice, dried oregano, salt, and black pepper.
-
3Add the chicken thighs to the bowl and toss to coat evenly in the marinade. Let marinate for at least 10 minutes.
-
4Arrange the chicken thighs in a baking dish. Place lemon slices on and around the chicken.
-
5Bake for 35 minutes, or until the chicken is golden and cooked through (internal temperature should reach 165°F/74°C).
-
6Garnish with chopped fresh parsley before serving.
Approximate Information for One Serving
Nutrition Disclaimers
Number of total servings shown is approximate. Actual number of servings will depend on your preferred portion sizes.
Nutritional values shown are general guidelines and reflect information for 1 serving using the ingredients listed, not including any optional ingredients. Actual macros may vary slightly depending on specific brands and types of ingredients used.
To determine the weight of one serving, prepare the recipe as instructed. Weigh the finished recipe, then divide the weight of the finished recipe (not including the weight of the container the food is in) by the desired number of servings. Result will be the weight of one serving.
Did you make this recipe?
Please consider Pinning it!!


