A Little Story Before We Get Baking
Okay, so let’s set the scene: it’s a Saturday, my kitchen is already a bit of a disaster, and I’m knee-deep in flour because (of course) someone just had to remind me about those German Chocolate Pecan Pie Bars I brought to last year’s block party. You know the kind of recipe that gets requested again and again, even by that neighbor who always forgets your name? Yeah, these are those bars. I found the original scribbled on the back of a grocery receipt ages ago (pretty sure it was my aunt’s… maybe?), and I’ve been tweaking it ever since. Honestly, I think these bars are the reason my family forgives me for running out of milk half the time. And hey, if you end up with a chocolate smear on your shirt, just call it a badge of honor!
Why You’ll Love This (Trust Me, You Will)
I make these bars when I want something that feels a little fancy but actually isn’t hard at all—like after a bad work week or when my youngest is begging for something chocolatey. My family goes wild for the gooey middle and crunchy pecans (though, if I’m honest, my husband picks at the edges first—what’s up with that?). I appreciate that you can make ‘em ahead—if you don’t eat half the pan straight from the oven, that is. Oh, and if you’ve ever struggled with pie crust? Bars are easier. No judgment if you’re not a “perfect crust” kind of person. I’m not, either.
Here’s What You’ll Need (Plus a Few Swaps)
- 1 cup unsalted butter, melted (I’ve used salted in a pinch—just skip the added salt)
- 2 cups all-purpose flour (sometimes I swap in 1 cup whole wheat to feel virtuous)
- 1/2 cup packed brown sugar (light or dark, honestly either works)
- 1/2 teaspoon salt (if you used salted butter, do half this or leave it out)
- 1 1/4 cups sweetened shredded coconut (my friend swears by unsweetened but it’s not the same vibe)
- 1 1/4 cups semisweet chocolate chips (milk chocolate works too—my kids actually prefer it)
- 1 1/2 cups chopped pecans (walnuts are okay, but it’s never quite right to me)
- 3 large eggs
- 1 cup light corn syrup (I know, but it’s classic; golden syrup works too)
- 1 cup granulated sugar (I tried coconut sugar once—not my favorite, but go wild)
- 2 teaspoons vanilla extract (my grandma always insisted on vanilla bean paste, but extract’s fine)
Let’s Make These Bars (It’s Easier Than Pie!)
- Preheat your oven to 350°F (180°C). Line a 9×13-inch pan with parchment if you hate scrubbing pans, like me. Or just spray it and hope for the best.
- In a big-ish bowl, mix melted butter, flour, brown sugar, and salt until it gets crumbly. You can use clean hands—it’s honestly more fun. Press it into the bottom of the pan. Don’t stress about perfection; lumpy spots = charm.
- Bake this bottom bit for about 12 minutes, just until it looks a little set. (This is where I usually sneak a taste of the dough. No regrets.)
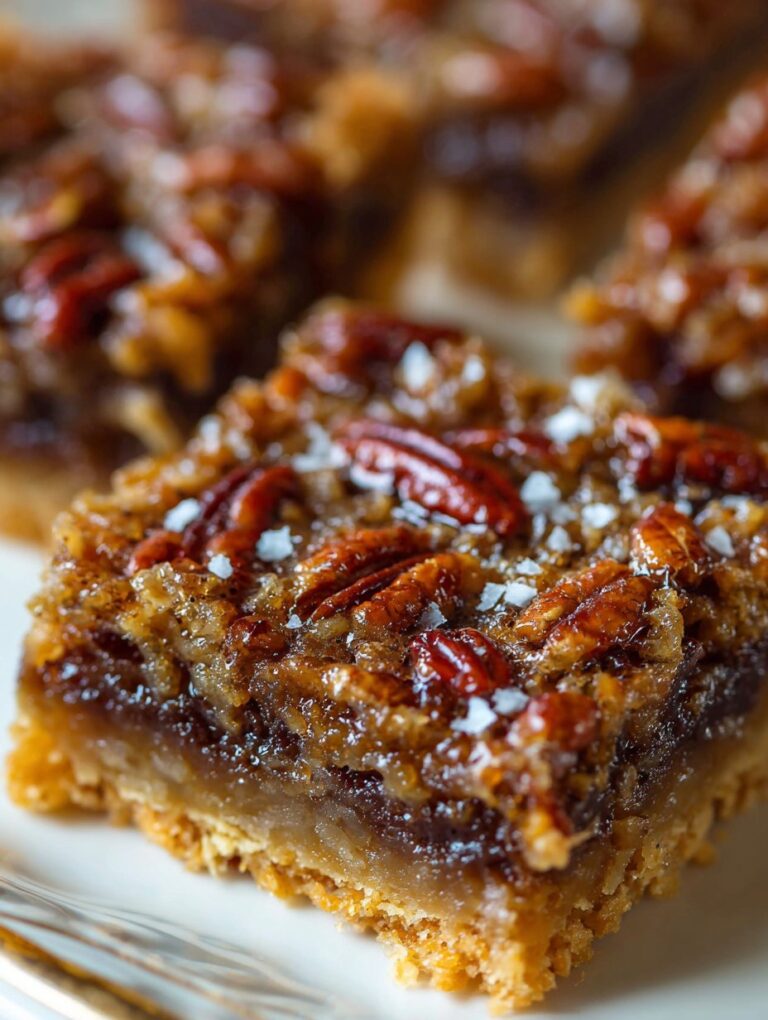
- Sprinkle coconut, chocolate chips, and pecans all over the warm crust. Sometimes I throw in extra chocolate chips if I’m feeling rebellious.
- For the gooey top: whisk eggs, corn syrup, sugar, and vanilla together in a medium bowl. When it’s smooth-ish, pour it all over the stuff in your pan. Try to cover everything evenly, but if some pecans float, it’s all part of the fun.
- Bake again for 25–30 minutes. It should look puffed and a bit jiggly in the center. If the edges get way too dark, cover them with foil (or, you know, just eat the edges yourself—that’s what I do).
- Let the bars cool completely before cutting. Seriously. I’ve ruined plenty by rushing. (You can stick ‘em in the fridge if you’re impatient but don’t blame me if they’re a bear to slice.)
Notes form My (Kinda Messy) Kitchen
- If your pecans burn fast, try tucking them under the coconut. I always forget and then act surprised every time.
- I used to bake these right in the pan without parchment. Clean-up takes forever. Honestly, just use it.
- The bars set up firmer if you refrigerate them awhile. I think they taste better the next day, but my kids don’t let them last that long.
- A random tip: if you spill coconut on the floor, it’s slipperier than an eel—just saying.
Variations I’ve Actually Tried (and One Dud)
- Swapping pecans for hazelnuts once. Pretty tasty, but a slightly weird aftertaste. Your call.
- Added a spoonful of espresso powder to the crust—surprisingly good, but not for little kids.
- Tried a gluten-free blend for the crust. Actually, I find it works better if you use a touch less butter.
- Don’t use maple syrup instead of corn syrup. Tastes good, but the bars never set. Oops.
What If I Don’t Own Every Tool?
Technically, a stand mixer is nice for the crust, but a bowl and sturdy spoon work just fine (I mean, who wants extra dishes anyway?). No parchment? Just use foil and spray it, or be ready to dig the bars out—been there. And if you don’t have a 9×13, use two loaf pans; the bars’ll be thicker, but honestly, that’s not a bad thing.

Storing Your Bars (If You Have Any Left)
If, by some miracle, you’ve got leftovers, cover and store at room temp for up to 3 days. They do get a bit chewier in the fridge, which I kind of love. I’ve heard you can freeze ‘em, but honestly, in my house it never lasts more than a day, so who knows?
How I Like to Serve Them (But Do Your Thing)
We usually just cut ‘em into squares and eat with our hands—much less fuss. But—and this is a family thing—sometimes we warm a piece and add a scoop of vanilla ice cream on top. It’s outrageously good. My niece tried topping hers with whipped cream; I wasn’t sold, but maybe you’ll like it?
The “Wish-I’d-Known” Pro Tips
- I once tried rushing the cooling, slicing when it was too warm. Regretted it because the filling just oozes everywhere. Wait it out—it’s worth it.
- Don’t skip lining your pan. For real. Only makes sense once you’ve had to soak a pan overnight.
- (Oh, and don’t double the recipe unless you have two pans. Trust me.)
FAQ (Yes, People Really Ask Me This Stuff)
- Can I make these ahead? Sure thing. Actually, I think the flavor gets even better after a day. Just cover and store.
- Do I have to use corn syrup? You don’t, technically. Golden syrup works, but maple syrup? Not so much—it won’t set right.
- Can I use walnuts? Yep! But, in my humble opinion, pecans give the best texture and taste.
- Why did my filling stay runny? Might be underbaked, or you cut it too soon (I’ve been there, more than once!). Give it time.
- What’s the difference between German chocolate and regular chocolate? So, German chocolate is milder and sweeter. I usually just use semisweet chips since that’s what I’ve got on hand—here’s a fun explainer: Bon Appétit German Chocolate Guide
- Can I make this dairy-free? Probably! Use vegan butter and nondairy chocolate. I haven’t tried it, but I’ve seen some good options on Minimalist Baker.
And if you want a primer on how to toast pecans without burning them (I’ve done it—twice), this guide from Cookie & Kate is spot on.
Let me know if you try these, or if you end up with a pan full of crumbs and a happy, chocolate-smeared grin. Happy baking, mate!
Ingredients
- 1 cup all-purpose flour
- 1/2 cup unsalted butter, softened
- 1/4 cup granulated sugar
- 1 cup semisweet German chocolate, chopped
- 1 cup pecan halves, toasted and chopped
- 3/4 cup light corn syrup
- 1/2 cup packed light brown sugar
- 2 large eggs
- 1 teaspoon vanilla extract
- 1/4 teaspoon salt
Instructions
-
1Preheat oven to 350°F (175°C). Line a 9×9-inch baking pan with parchment paper, leaving an overhang for easy removal.
-
2In a medium bowl, combine flour, softened butter, and granulated sugar. Mix until crumbly, then press evenly into the bottom of the prepared pan to form the crust.
-
3Bake the crust for 12-15 minutes, or until lightly golden. Remove from oven and sprinkle chopped German chocolate evenly over the hot crust.
-
4In a separate bowl, whisk together corn syrup, brown sugar, eggs, vanilla extract, and salt until smooth. Stir in chopped pecans.
-
5Pour the pecan mixture over the chocolate layer. Return the pan to the oven and bake for 25-28 minutes, or until the filling is set and golden brown.
-
6Allow bars to cool completely in the pan before lifting out and cutting into squares. Serve and enjoy.
Approximate Information for One Serving
Nutrition Disclaimers
Number of total servings shown is approximate. Actual number of servings will depend on your preferred portion sizes.
Nutritional values shown are general guidelines and reflect information for 1 serving using the ingredients listed, not including any optional ingredients. Actual macros may vary slightly depending on specific brands and types of ingredients used.
To determine the weight of one serving, prepare the recipe as instructed. Weigh the finished recipe, then divide the weight of the finished recipe (not including the weight of the container the food is in) by the desired number of servings. Result will be the weight of one serving.
Did you make this recipe?
Please consider Pinning it!!


