Pull Up a Chair — Let’s Make Banana Pudding Cheesecake!
I swear, if you’d told me a few years ago that I’d be baking a New York Style Banana Pudding Cheesecake for fun, I probably would’ve laughed and gone for another scoop of vanilla instead. But here’s the thing—I tried a slice at a tiny Brooklyn diner once, and my life was changed (or at least my dessert priorities were). Now, this is my go-to for birthdays, potlucks, or just those long weekends when I need an edible hug. Oh, and if you manage not to eat the leftovers at 2 a.m.? You have far more willpower than I do.
Why You’ll Love This (No, Really)
I make this when my friends are coming over and I want to pretend I have my act together. My family goes crazy for it—mostly the kids, though I catch my husband sneaking forkfuls from the fridge late at night. It’s creamy, nostalgic, and ridiculously over the top in the best way. (One warning: Sometimes the crust gets a little stubborn, but honestly, nobody complains when there’s banana pudding and cheesecake in the same bite.)
The Stuff You’ll Need (with Swaps!)
- Crust: 2 cups vanilla wafer crumbs (Nilla is the classic, but I’ve used graham crackers when I couldn’t be bothered to go to the store; both work. My grandma swore by them!)
- 1/2 cup (about 1 stick) unsalted butter, melted
- Filling: 3 (8 oz) bricks cream cheese, room temp (okay, I’ve used the light stuff in a pinch, but it’s not quite as rich)
- 1 cup sugar
- 3 large eggs
- 1/4 cup sour cream (Greek yogurt works if that’s what’s in the fridge, and sometimes I actually prefer it)
- 2 teaspoons vanilla extract (I ran out once and tried maple syrup, which was…interesting, but not a repeat)
- 2 ripe bananas, mashed (look for the spotty ones—they taste sweeter!)
- Banana Pudding Layer: 1 box (3.4 oz) instant banana pudding mix
- 1 1/2 cups cold milk (whole is best, but honestly, I’ve used almond milk and nobody noticed)
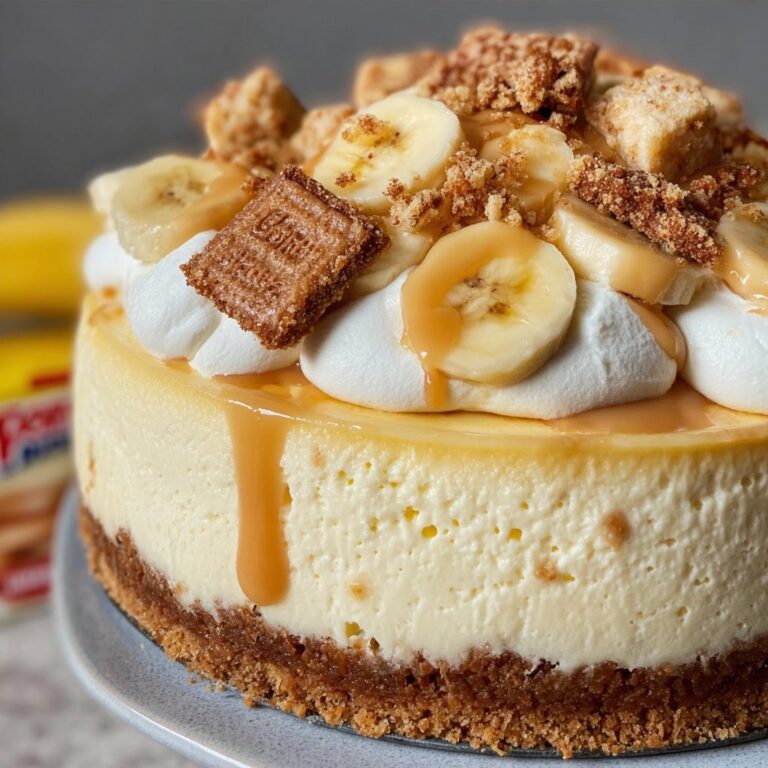
- Topping: Whipped cream (the aerosol can is totally fine, but homemade gives major bonus points), extra vanilla wafers, and sliced bananas
Let’s Get Baking—But Not Too Serious
- Set the Stage: Preheat your oven to 325°F (that’s about 160°C if you’re somewhere else). Grab a 9-inch springform pan. No springform? A regular deep pie dish works in a pinch—just be ready for a bit of a wrestle when serving.
- Crust Time: Mix your crushed wafers and melted butter together till it looks like slightly wet sand (weird comparison, but you’ll know). Press firmly into the bottom of your pan. I use a measuring cup sometimes, but, honestly, fingers are more fun. Bake for 10 minutes, then let it cool while you prep the filling.
- Cheesecake Filling: Beat cream cheese till smooth—this takes a couple of minutes, and I usually get impatient, but truly, lumps make it weird, so keep going. Add sugar and mix. Then add eggs, one at a time (don’t dump them all in or it gets splashy and then you’ll be cleaning egg off your counters for days). Mix in sour cream, vanilla, and mashed bananas. At this point, I have to stop myself from eating it with a spoon; it’s that good.
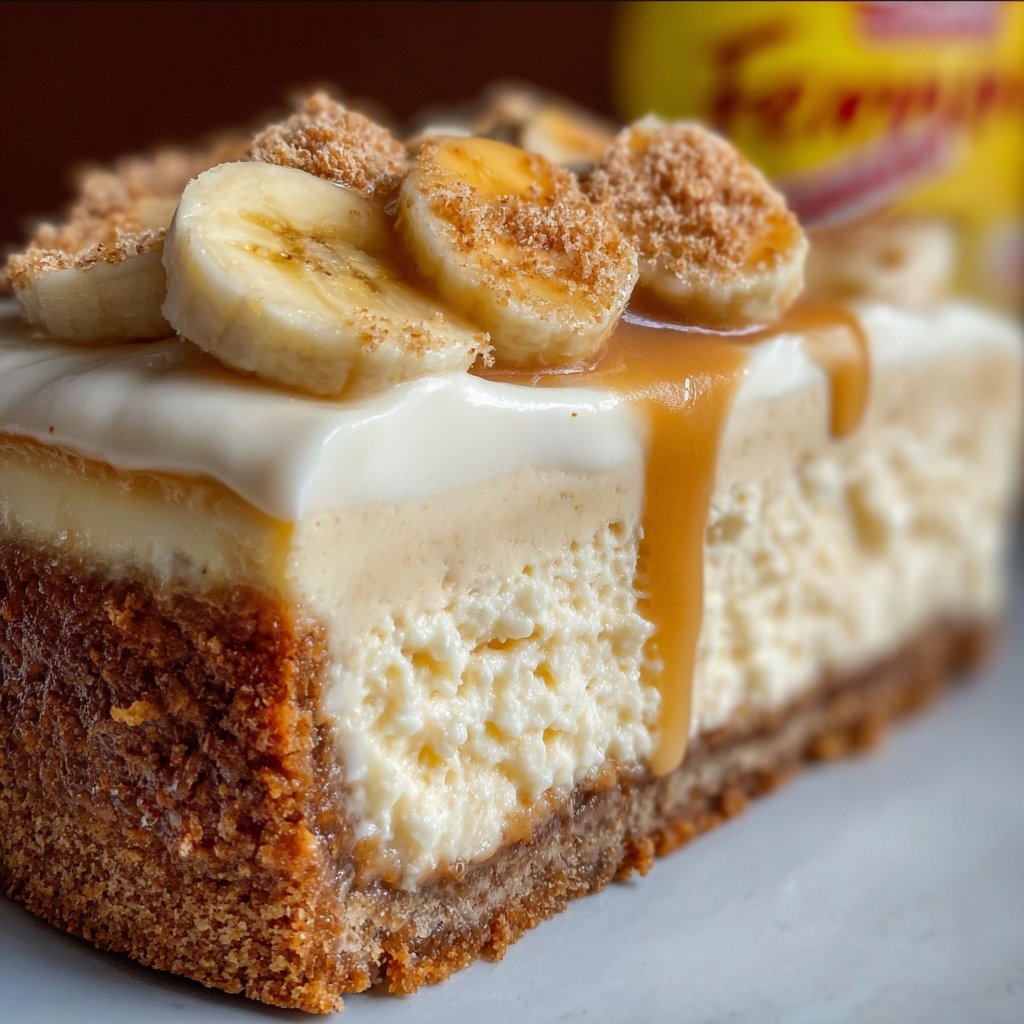
- Into the Pan: Pour the filling over your crust. Smooth it out as best as you can—it doesn’t have to be perfect. Place pan on a baking sheet (trust me, it saves your oven from drips). Bake for about 50–60 minutes. The center should wobble a bit when you shake it, like a soft-set jelly. Don’t panic if it cracks; we’re covering it up later anyway.
- Cool It Down: Turn off the oven and crack the door open (I wedge a wooden spoon in there). Let it rest for an hour, then take it out and chill it in the fridge for at least 4 hours, or overnight if you can stand to wait. And yes, it always tastes better the next day—no idea why.
- Pudding Layer: Whisk pudding mix and milk together for about 2 minutes, till thick. Spread gently over the cooled cheesecake. Sometimes I make a mess here, but that’s half the fun, right?
- Toppings: Just before serving, top with whipped cream, sliced bananas, and a scattering of wafers. I’ve gone overboard with the whipped cream before—it’s never once been a problem.
Notes From the Trenches
- If your cheesecake cracks, call it “rustic.” Cover with more whipped cream and nobody will know.
- I’ve tried using banana extract, but it always tasted a bit too…fake for me. Stick with the real fruit if you can.
- Don’t skip the chilling time. Once I did, and the whole thing kind of slumped onto the plate. Still delicious, but less Instagrammable.
Variations I’ve Attempted (With Mixed Results)
- Subbed in chocolate wafers for the crust—turns out, pretty tasty, but you lose that classic banana pudding vibe.
- Once, I tried swirling peanut butter into the batter (because who doesn’t love PB?), but honestly, it overpowered the banana. Next time, I’d just drizzle a little on top.
- I did try a gluten-free version with almond flour in place of wafers. It came out a bit crumbly, but the flavor was spot on.
What If I Don’t Have Fancy Equipment?
Okay, a springform pan is ideal. But I’ve totally made this in a regular cake pan and just served it in slices, pie-style. Grease it well and use parchment if you can. No electric mixer? Roll up your sleeves and use a sturdy whisk, though your arm might complain after—consider it a bonus workout.
How to Store It (Assuming You Have Leftovers!)
Keep leftovers (if you’re lucky enough to have them) in an airtight container in the fridge. It’ll keep for 2-3 days, though honestly, in my house it never lasts more than a day! I don’t recommend freezing it—texture gets a bit odd after thawing, in my opinion.
Serving: Make It Your Own
I love serving big slices with extra whipped cream and a fresh banana on top (sometimes with a little drizzle of caramel sauce if I’m feeling fancy). My cousin once brought sprinkles, which made it look like a birthday cake. You do you!
Lessons Learned (aka Pro Tips)
- Don’t rush the cooling; I did once and ended up with a sad, runny cheesecake soup.
- Let your cream cheese get to room temp. I tried microwaving it to speed things up and created a weird lumpy mess—don’t be me.
- Clean your knife with a hot towel between slices for neater servings. I forget half the time, but when I remember, everyone’s impressed.
FAQ (Because I Get These A Lot!)
- Can I make this ahead? Absolutely—I actually think this tastes better the next day. Let all those flavors get comfy together.
- What if I don’t like bananas? Well, it’s banana pudding cheesecake, but if you want to swap in strawberries, that could work? Haven’t tried it myself, though.
- Is there a way to make this lighter? Sort of! Use light cream cheese, swap Greek yogurt for sour cream, and maybe go easy on the whipped cream. It’s still dessert, so don’t expect a miracle.
- Any good resources for baking newbies? For technique, Sally’s Baking Addiction is super helpful. For pudding layers, Serious Eats has great tips!
- Can I use store-bought pudding? You can; I do sometimes when short on time. Just go with what you have—it’s all good.
Oh, by the way—if you ever find a way to make the crust stay perfectly crisp for days, let me know, will you? I’ve tried to figure it out, but it’s my white whale. Until then, I’ll just keep baking and eating this cheesecake, one (messy) slice at a time.

Ingredients
- 2 cups vanilla wafer crumbs
- 1/2 cup unsalted butter, melted
- 3 (8 oz) packages cream cheese, softened
- 1 cup granulated sugar
- 3 large eggs
- 1 cup mashed ripe bananas (about 2 bananas)
- 1/2 cup sour cream
- 1 package (3.4 oz) instant banana pudding mix
- 1 teaspoon vanilla extract
- 1 cup heavy cream, whipped
- 2 bananas, sliced (for layering and garnish)
- Extra vanilla wafers (for garnish)
Instructions
-
1Preheat oven to 325°F (163°C). In a bowl, combine vanilla wafer crumbs and melted butter. Press mixture firmly into the bottom of a 9-inch springform pan to form the crust.
-
2In a large mixing bowl, beat cream cheese and sugar until smooth and creamy. Add eggs one at a time, mixing well after each addition.
-
3Mix in mashed bananas, sour cream, banana pudding mix, and vanilla extract until fully combined.
-
4Pour half of the cheesecake batter over the crust. Layer with sliced bananas and a handful of vanilla wafers. Pour the remaining batter on top and smooth the surface.
-
5Bake for 1 hour and 10 minutes, or until the center is almost set. Let cool to room temperature, then refrigerate for at least 4 hours or overnight.
-
6Before serving, top with whipped cream, additional banana slices, and extra vanilla wafers for garnish.
Approximate Information for One Serving
Nutrition Disclaimers
Number of total servings shown is approximate. Actual number of servings will depend on your preferred portion sizes.
Nutritional values shown are general guidelines and reflect information for 1 serving using the ingredients listed, not including any optional ingredients. Actual macros may vary slightly depending on specific brands and types of ingredients used.
To determine the weight of one serving, prepare the recipe as instructed. Weigh the finished recipe, then divide the weight of the finished recipe (not including the weight of the container the food is in) by the desired number of servings. Result will be the weight of one serving.
Did you make this recipe?
Please consider Pinning it!!


