
Let Me Tell You About This Peach Cobbler Cheesecake
I still remember the first time I tried to mash peach cobbler and cheesecake together—half the family thought I’d lost my marbles, but after that first bite, nobody complained. Actually, it was at my Aunt Janine’s house during one of those sweltering mid-July afternoons, and we needed something cold… but also, you know, a little extra. So, I rolled up my sleeves, half-followed a recipe (and half ignored it, sorry Mom), and this beauty was born. If you like desserts that are a little over the top but pure comfort, well, you’re in for a treat. Oh, and I once nearly set off the smoke alarm caramelizing peaches—don’t do that, trust me.
Why You’ll Love This (Or Why My Bunch Does)
I pull this recipe out when I want to impress but don’t want to fuss much (though it does look like you worked your fingers to the bone). My family downright polishes off the pan. Sometimes my son picks out just the peach topping and leaves the cheesecake, but—hey, more for me! If you ever get bored with regular cheesecake, adding spiced peaches is a total game changer. Also, not going to lie: I make this when peaches start looking sad in the fruit bowl and I can’t handle the guilt of wasting them.
What You’ll Need (And Yes, You Can Sub Stuff!)
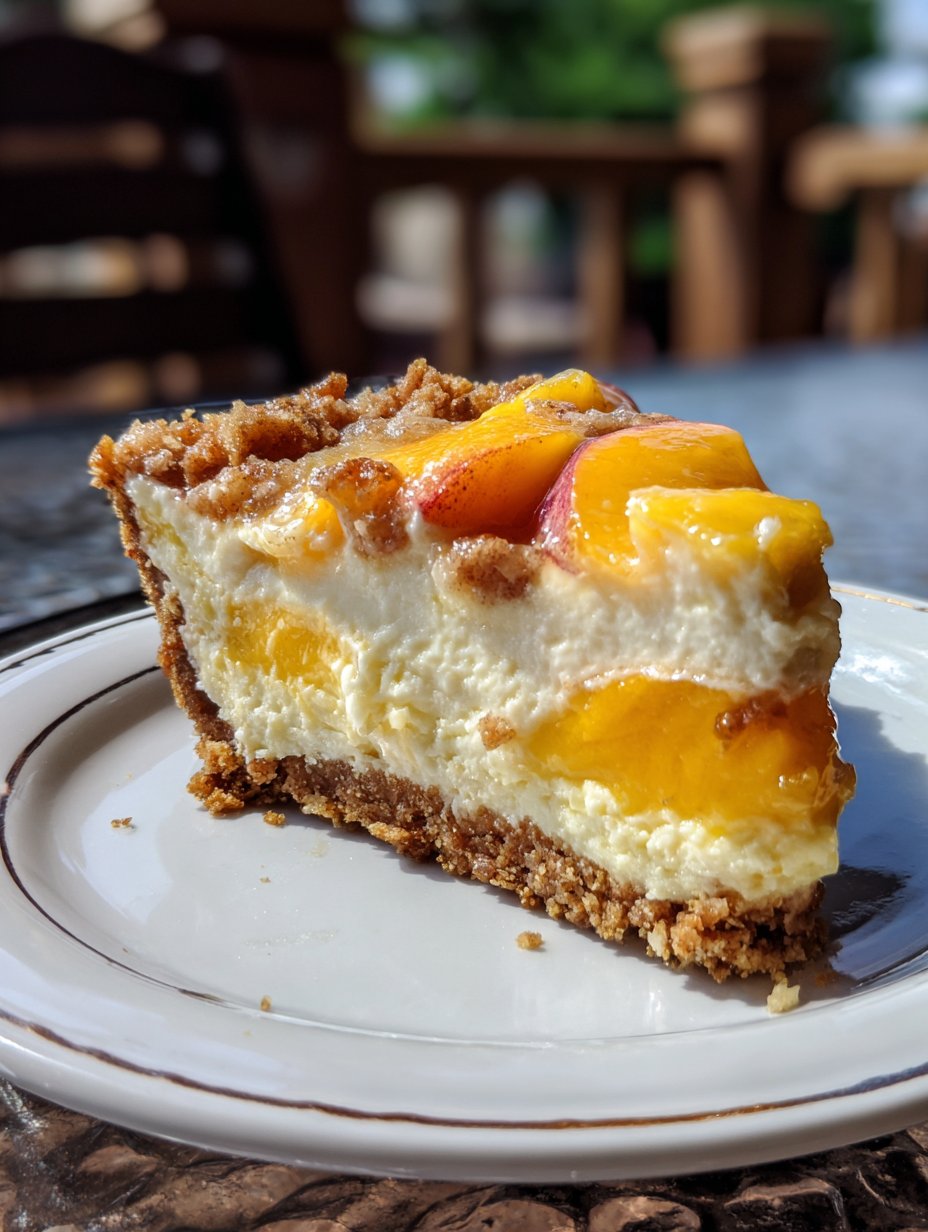
- Crust: 1 1/2 cups graham cracker crumbs (I’ve used digestive biscuits, or even gingersnaps in a pinch—spicier, but yum), 1/4 cup sugar, 1/3 cup melted butter (salted or unsalted, really doesn’t matter).
- Cheesecake Layer: 2 (8 oz) packs cream cheese (I sometimes use Neufchâtel if it’s on sale), 2/3 cup sugar, 2 large eggs, 1/2 cup sour cream (plain Greek yogurt works if that’s what’s in the fridge), 1 tsp vanilla extract (I admit, I’ve forgotten it before and nobody noticed).
- Peach Cobbler Topping: 3-4 ripe peaches (or a 15 oz can, drained—no shame), 1/3 cup brown sugar, 1/2 tsp cinnamon, 1/4 tsp nutmeg (sometimes I swap this for allspice, or just skip it), 1 tbsp cornstarch, juice from half a lemon (or just a squirt of the bottled stuff if I’m lazy).
- Optional: Pinch of salt, a handful of chopped pecans (Aunt Janine swears by them, but I forget most times).
How I Actually Make This (With a Few Side Steps)
- Preheat your oven to 325°F (160°C). I usually forget until halfway through prepping the crust. If you don’t, congrats! You’re ahead of me.
- Mix up the crust: Combine graham crumbs, sugar, and melted butter in a bowl. It should feel like damp sand. Press it firmly into the bottom of a 9-inch springform pan (no springform? I’ve used a regular cake pan lined with parchment—just don’t expect perfect slices!). Bake for about 8-10 minutes till lightly golden. Let it cool while you do other things.
- Cheesecake filling time: Beat the cream cheese with sugar until smooth—lumps are the enemy here. Add eggs one at a time (I crack them into a bowl first, just in case), then mix in sour cream and vanilla. Try not to overbeat or it gets weirdly fluffy, which isn’t the vibe for this recipe.
- Pour filling onto crust. Smooth it out with a spatula—my favorite part. Bake for 35-40 minutes until it’s just set in the middle (a little jiggle is good, it’ll firm up in the fridge).
- While that bakes, make your peach topping: Slice peaches (leave skins on if you like, I do when I’m feeling lazy). Toss with brown sugar, cinnamon, nutmeg, lemon juice, and cornstarch. Cook in a saucepan over medium heat until thick and syrupy—about 6-8 minutes. This is usually where I sneak a taste, and sometimes burn my tongue. Worth it.
- Cool time: Let the cheesecake cool to room temp, then chill in the fridge for at least 3 hours (overnight if you can stand to wait). Actually, I think it tastes better the next day.
- Before serving, spoon that peach topping over the cheesecake. Sprinkle pecans over if you remembered them.
Notes from the Kitchen Chaos
- If you get cracks in your cheesecake, just cover them with peaches. Nobody will know—or care.
- I once forgot to chill it before serving. It was tasty but a bit of a mess. Lesson learned.
- Don’t stress about the crust sticking to the pan. Run a warm knife around the edge and it should pop out. Usually.
Variations I’ve Tried (and a Fail or Two)
- I swapped in canned apricots once—tasted good, but not the same magic as peach.
- My cousin tried making it gluten-free with almond flour in the crust. Actually, not bad at all!
- Attempted a “healthy” version with low fat cream cheese; honestly, it just wasn’t worth it. Go big or go home.
What You’ll Need Equipment-Wise (Or Improvise!)
- 9-inch springform pan (a regular cake pan with parchment will do if you’re careful)
- Mixing bowls (I always end up using 3 or 4 somehow)
- Electric mixer (but I’ve mixed by hand, just takes more elbow grease)
- Saucepan for the peaches
- Spatula (or a big spoon, honestly)
Storage (But Don’t Count On Leftovers)
Keep leftovers in the fridge, covered. It’ll last up to 3 days, but honestly, in my house it never survives more than a day and a half. If you somehow have extra, you can freeze slices tightly wrapped—just let them thaw in the fridge overnight. Just don’t expect the texture to be quite the same, but maybe I’m picky.
How I Like to Serve It
Ice cold, with a big dollop of whipped cream (homemade if I’m feeling ambitious, canned if I’m not). Sometimes I dust a little extra cinnamon on top, just for looks. If we’re feeling fancy, I’ll add a scoop of vanilla ice cream. My neighbor swears by serving it with cold sweet tea—very Southern, very summery. Oh, and we eat it straight from the pan sometimes. No shame.
Pro Tips (Learned the Hard Way)
- Don’t rush the chilling. I once tried to serve it after an hour—total soup. Not worth it, promise.
- If your peaches aren’t super sweet, add a smidge more sugar to the topping. Taste as you go!
- And if you overcook the peaches, just call it “caramelized”—nobody will argue.
Quick FAQ (Because People Always Ask)
- Can I use frozen peaches? Yep, just thaw and drain them first. They work fine (sometimes even better in winter!).
- What if I don’t have a springform pan? Use a regular cake pan and line it with parchment, then lift out carefully. Not perfect, but it works.
- Is it supposed to be jiggly when I take it out? Yes! If it’s totally solid, it’s probably overcooked.
- Can I swap out the fruit? You can, but honestly, it’s best with peaches. Berries get a bit runny, apples can work but need more cooking.
- Do I have to peel the peaches? Nah, not unless you want to. The skins get soft and add color.
For some more cheesecake inspiration, Sally’s Baking Addiction has a great no-fail recipe, and if you’re curious about cobbler variations, Simply Recipes breaks down the classics.
And one last thing—if you try this and it turns out differently than mine, well, that’s the fun of home baking, isn’t it? No two kitchens are ever the same. Let me know how it goes!
Ingredients
- 2 cups graham cracker crumbs
- 1/2 cup unsalted butter, melted
- 3 (8 oz) packages cream cheese, softened
- 1 cup granulated sugar
- 3 large eggs
- 1 teaspoon vanilla extract
- 2 cups sliced peaches (fresh or canned, drained)
- 1/2 cup brown sugar
- 1 teaspoon ground cinnamon
- 1 cup all-purpose flour
- 1/2 cup cold unsalted butter, cubed
Instructions
-
1Preheat oven to 325°F (163°C). Grease a 9-inch springform pan.
-
2Combine graham cracker crumbs and melted butter. Press mixture into the bottom of the prepared pan to form the crust.
-
3In a large bowl, beat cream cheese and granulated sugar until smooth. Add eggs one at a time, then mix in vanilla extract. Pour over the crust.
-
4In a separate bowl, toss sliced peaches with brown sugar and cinnamon. Spoon the peaches evenly over the cheesecake batter.
-
5For the cobbler topping, mix flour and cold butter until crumbly. Sprinkle over the peaches.
-
6Bake for 60 minutes or until the center is set. Cool completely, then refrigerate for at least 4 hours before serving.
Approximate Information for One Serving
Nutrition Disclaimers
Number of total servings shown is approximate. Actual number of servings will depend on your preferred portion sizes.
Nutritional values shown are general guidelines and reflect information for 1 serving using the ingredients listed, not including any optional ingredients. Actual macros may vary slightly depending on specific brands and types of ingredients used.
To determine the weight of one serving, prepare the recipe as instructed. Weigh the finished recipe, then divide the weight of the finished recipe (not including the weight of the container the food is in) by the desired number of servings. Result will be the weight of one serving.
Did you make this recipe?
Please consider Pinning it!!


