
So, Why Am I Obsessed with These Rhubarb Oat Bars?
Oh, let me tell you—rhubarb season is my unofficial excuse for turning the kitchen upside down every spring. The first time I made these bars, I was honestly just trying to use up a mountain of rhubarb from my neighbor’s garden (she’s a gem, but the sheer volume…). Anyway, turns out, these humble oat bars became a bit of a legend at our house. One time I brought them to a picnic and, no joke, one of the kids called them “squishy crumble squares”—which, frankly, is a fair description. But they vanished in minutes. And that, my friend, is the sign of a keeper.
Why You’ll Love This (or at least why I do!)
I make this when I want something sweet but not too sweet—like, you get a zingy kick from the rhubarb but it’s cushioned by the buttery oats. My family goes crazy for these (especially if I add a handful of strawberries, and sometimes I do sneak some in when I’m feeling wild). They’re also perfect if you’re in a “can’t be bothered” mood because the recipe’s super forgiving. Sometimes I even use frozen rhubarb and it honestly works fine—just don’t tell my grandmother, she’d have words. Oh, and the oat topping? It’s crumbly, golden, and secretly the best bit, even if it makes a mess everywhere. Worth it.
What You’ll Need (and what I swap in a pinch)
- Rhubarb: About 2 cups, chopped (fresh is fab, but frozen totally works—just don’t thaw, toss it straight in)
- Sugar: I use 3/4 cup in total (divided); sometimes I do half white, half light brown for oomph
- Rolled oats: 1 cup—I’ve used quick oats in a pinch but whole oats give a better chew, I think
- All-purpose flour: 1 cup; my aunt uses spelt flour, which is a bit fancy but lovely if you’re into that
- Butter: 1/2 cup, melted (I’ve tried margarine, but it never tastes quite right to me)
- Baking soda: 1/2 teaspoon
- Salt: Big pinch
- Vanilla extract: 1 teaspoon (sometimes I swap almond extract—tastes nostalgic, like old-school bakeries)
- Optional: Splash of lemon juice (perks up the rhubarb), handful of chopped strawberries or raspberries, a bit of cinnamon if you like a warm note
Let’s Make Some Bars (or just a rhubarb-y mess, it’s fine)
- Prep the rhubarb filling: Toss your chopped rhubarb with 1/2 cup sugar and lemon juice (if using). Let it sit while you do the base—this helps it soften up and gets a bit juicy. Don’t freak out if it looks syrupy; that’s normal.
- Mix the oat base/topping: In a big bowl, stir together oats, flour, baking soda, salt, and the rest of your sugar. Pour in the melted butter and vanilla, then use a fork (or your hands, honestly) to get it all clumpy. You want some crumbles, not a dough.
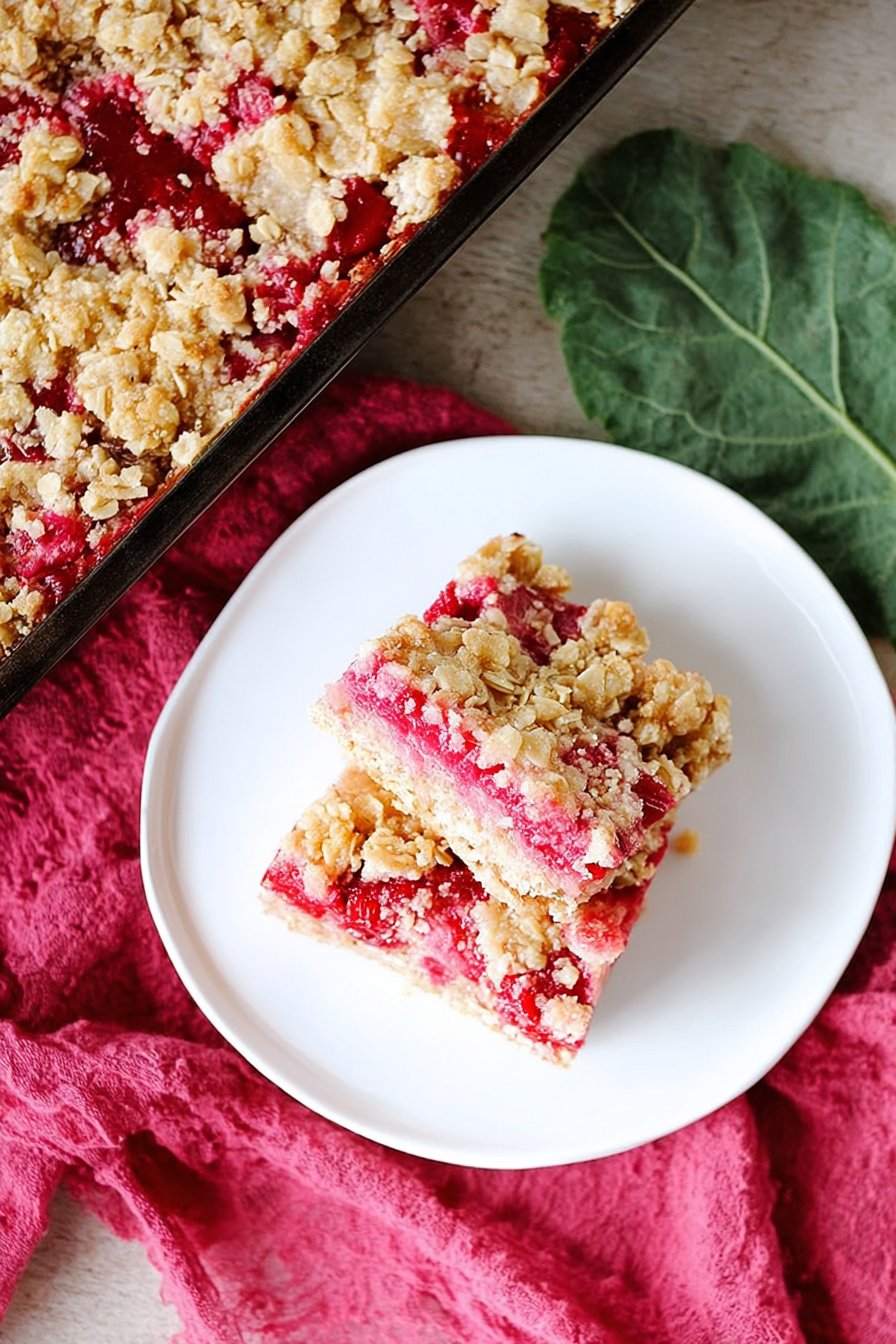
- Layer it up: Press about 2/3 of the oat mix into the bottom of a lined 8×8 inch pan. I never get it perfectly even and it never matters. Scatter the rhubarb mixture (including all the syrupy bits) on top. Then, sprinkle the rest of the oat mixture over everything—don’t fuss, it’s rustic.
- Bake: Pop in the oven at 180°C/350°F for about 35-40 minutes. You want the top golden and the edges a bit bubbly. This is where I usually sneak a corner, burning my tongue. Every. Single. Time.
- Cool: Let the bars cool in the pan (I struggle with this, but if you cut them hot they’ll fall apart like a bad Jenga tower). Slice, eat, repeat.
Things I Wish I’d Known (Notes from my kitchen experiments)
- If you use frozen rhubarb, don’t bother thawing—it gets mushy otherwise.
- I sometimes up the salt (like, a generous pinch) and it really brightens things up.
- Trying to halve the butter just made the bars dry and sad. Would not recommend.
- Actually, letting the bars sit overnight makes them easier to cut. Not that they last that long here.
Stuff I’ve Tried (Variations—some hits, one miss)
- Strawberry-rhubarb: Add 1/2 cup chopped strawberries—super classic, my kids prefer it this way.
- Gluten-free: Swapped in almond flour for regular, which totally works, but the bars are a bit more delicate (and taste kinda nutty, which I like).
- Vegan: Used coconut oil instead of butter—tasted good, but the texture was a tad greasier. If you’re into that, go for it.
- Chocolate chips: Once tried this. I mean… it wasn’t gross, but the flavors didn’t really get along.
Do I Really Need Special Equipment?
Listen, I always use my 8×8 baking tin because that’s what I inherited, but if you only have a round cake pan, just use that—slices may be triangles, which is fun. No parchment paper? Butter and flour the pan like in the old days. Fancy pastry cutter? I’ve always just used my hands, and yes, you get sticky but it’s half the fun.
How to Store Them (if you even have leftovers)
So, technically, you can keep these in an airtight container at room temp for 2 days or in the fridge for up to 5. But honestly, in my house it never lasts more than a day! If you want to freeze them, pop squares between bits of parchment and they’ll defrost fine. I have forgotten them on the counter overnight—no one died, so there’s that.
How We Serve ‘Em at My Place
I love these slightly warm with a scoop of vanilla ice cream or—don’t laugh—a dollop of thick Greek yogurt for breakfast (let’s just call it wholesome). Sometimes we dust them with icing sugar if we’re feeling posh. My cousin puts them in school lunchboxes, though they get a bit crumbly by mid-morning. Still tasty though.
What I’ve Learned (a.k.a. My Pro Tips and Oopsies)
- Don’t rush the cooling. I once tried to slice them hot and just made a gooey mess (still ate it with a spoon though, so not exactly a tragedy).
- On second thought, if you want neat bars for guests, chill them in the fridge before cutting—makes a world of difference.
- Don’t skimp on the butter. Just… don’t.
- If your rhubarb is really sour, up the sugar a touch, but I like it zingy myself.
Stuff People Actually Ask Me (FAQ)
- Can I use other fruit?
- Oh, for sure! I’ve done raspberries, apples (chop ’em small), and even blackberries. Just keep the total fruit about 2 cups so it doesn’t get soggy.
- Can I make these gluten free?
- Yep, swap in a gluten-free flour blend or almond flour. Just go gentle on the mixing so they don’t get crumbly.
- Do these freeze well?
- They do! Cut into bars, layer with parchment or wax paper, and freeze in a bag. They defrost pretty quickly, which is handy if (like me) you have no patience.
- Is it okay to reduce the sugar?
- You can, but the bars will be less sticky and more tart. I tried with half once; wasn’t for me, but maybe you’d like it?
- Help! My topping looks uneven!
- Honestly, that’s how it’s meant to look. Rustic is the name of the game. Just call it homemade charm.
By the way, if you’re after more rhubarb inspiration, Smitten Kitchen’s coffee cake is a stunner, and if you want to geek out about rhubarb, rhubarbinfo.com has more ideas than you can shake a stick at. If you’re new to baking, Joy the Baker’s flour measuring tips are worth a peek.
Anyway, I’ve rambled enough. Go bake something a bit squishy—your future self will thank you (and probably need a napkin).
Ingredients
- 2 cups chopped fresh rhubarb
- 1 cup granulated sugar
- 1 tablespoon cornstarch
- 1 1/2 cups old-fashioned rolled oats
- 1 1/4 cups all-purpose flour
- 3/4 cup packed brown sugar
- 1/2 teaspoon ground cinnamon
- 1/2 teaspoon salt
- 3/4 cup unsalted butter, melted
- 1 teaspoon vanilla extract
Instructions
-
1Preheat the oven to 350°F (175°C). Line an 8×8-inch baking pan with parchment paper.
-
2In a saucepan, combine rhubarb, granulated sugar, and cornstarch. Cook over medium heat, stirring frequently, until the rhubarb softens and the mixture thickens, about 8-10 minutes. Set aside to cool slightly.
-
3In a large bowl, mix together oats, flour, brown sugar, cinnamon, and salt. Stir in melted butter and vanilla extract until the mixture is crumbly.
-
4Press about two-thirds of the oat mixture firmly into the bottom of the prepared pan to form the crust.
-
5Spread the rhubarb filling evenly over the crust. Sprinkle the remaining oat mixture over the top.
-
6Bake for 35-40 minutes, or until the top is golden brown. Allow to cool completely before cutting into bars.
Approximate Information for One Serving
Nutrition Disclaimers
Number of total servings shown is approximate. Actual number of servings will depend on your preferred portion sizes.
Nutritional values shown are general guidelines and reflect information for 1 serving using the ingredients listed, not including any optional ingredients. Actual macros may vary slightly depending on specific brands and types of ingredients used.
To determine the weight of one serving, prepare the recipe as instructed. Weigh the finished recipe, then divide the weight of the finished recipe (not including the weight of the container the food is in) by the desired number of servings. Result will be the weight of one serving.
Did you make this recipe?
Please consider Pinning it!!


