Let Me Tell You About My Cheesy Potato Obsession
So, honestly, this recipe for roasted potato slices with cheese is the one I keep coming back to when I’m not quite sure what to make for dinner (or, let’s face it, when I just want something that feels a little special without a lot of faff). It started one rainy Saturday; I had some sad potatoes, cheese odds and ends, and that was basically it. My housemate at the time wandered in, sniffed the air, and declared, “that smells like proper food!” which, coming from him, was high praise. Anyway, since then, it’s sort of become my lazy day comfort food—plus, you can dress it up or down depending on your mood (and, more importantly, what’s lurking in your fridge).
Why You’ll Love This (Or At Least Why I Do)
I make this when I want something that’s filling but not fussy, or when I have a friend coming over who I want to impress without, you know, stress sweating over a hot stove. My family goes bananas for this because it’s cheesy, crispy, and basically potato heaven. And if I’m being real, I used to get annoyed that the cheese would sometimes burn at the edges, but now I call those the chef’s treats (and sneak extra when no one’s looking).
What You’ll Need (And What You Can Swap In)
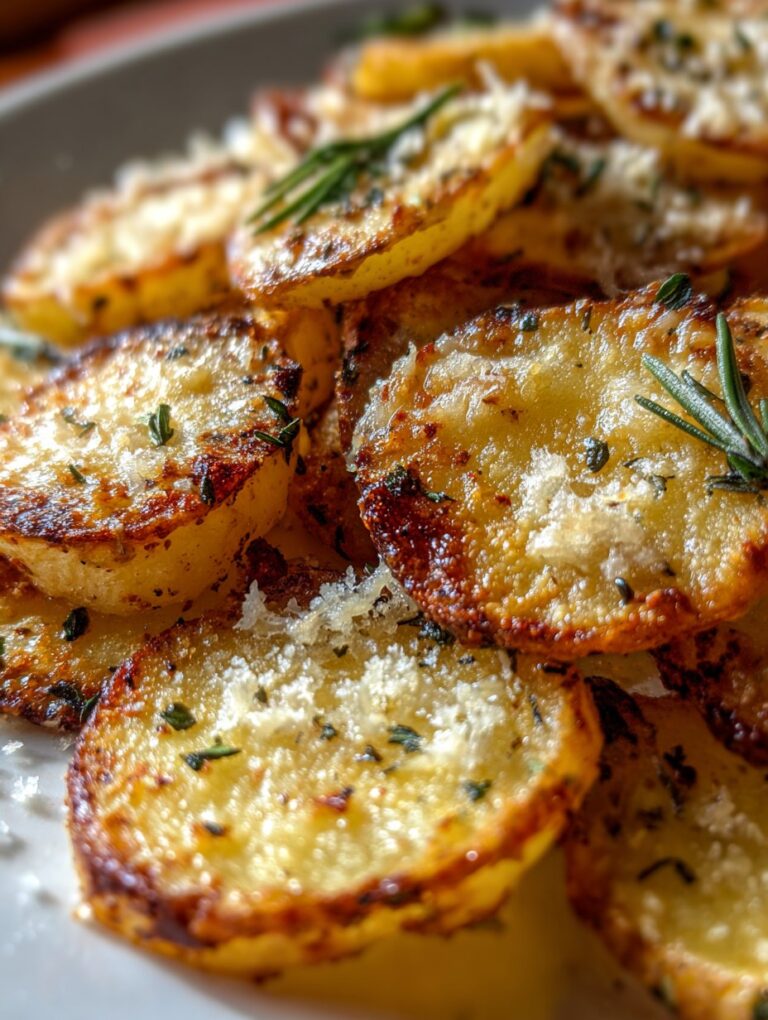
- 4-5 medium potatoes (Yukon Golds are my fav, but russets or even those red ones work fine—my gran swore by Maris Piper, though I don’t always bother)
- 2-3 handfuls grated cheese (cheddar is classic, but I’ve chucked in mozzarella, or even a bit of crumbled feta when that’s all I had—seriously, I once used a weird mystery cheese and it still came out good)
- 2 tbsp olive oil (or, honestly, any oil you have; I’ve used butter in a pinch)
- 1/2 tsp garlic powder (I go a bit overboard sometimes—fresh garlic is nice, too!)
- Salt and pepper, to taste (do not be shy with the salt, trust me)
- Optional: chopped fresh herbs (like thyme or chives)—totally skip if you can’t be bothered
- Optional: a sprinkle of smoked paprika, which gives it a bit of oomph
How I Throw It Together (Real Talk)
- First things first, preheat your oven to 425°F (220°C). Or 400°F if you’re worried about burning stuff—honestly, my oven runs hot, so I go lower.
- Slice the potatoes into rounds about 1/4 inch thick. No need to bust out a ruler. I sometimes leave the skins on because, well, who has time to peel them all?
- Toss the slices in a big bowl with oil, garlic powder, salt, and pepper. Use your hands (or a spatula if you’re feeling fancy). This is where I usually sneak a raw potato slice—don’t judge.
- Lay the slices out on a baking tray (lined with parchment if you remember, but don’t panic if you forget). Overlapping a bit is totally ok, but try to get them mostly flat in a single layer.
- Roast for about 20 minutes, flip the slices (or just nudge them around), then roast another 10 minutes. They should be getting golden and crispy at the edges. If they’re not, just give them a few more mins.
- Sprinkle over your cheese—pile it on, or go light if you’re pretending to be healthy. Pop back in the oven for 5-8 mins, until melty and bubbly. This is the bit where it smells so good I forget and burn my tongue every time.
- Scatter with herbs or paprika if you fancy, then let it cool a tick before serving (or don’t, but you’ll regret it when you burn your mouth, trust me).
Stuff I Wish I’d Known (Notes)
- Don’t overcrowd your tray unless you want sad, soggy potatoes (though, actually, sometimes I like the softer ones—call me weird)
- If your cheese is going too brown, just lay a bit of foil over the top for the last few mins
- I think this actually tastes better the next day, if it lasts that long
How I’ve Messed With This Recipe (Variations)
- Once, I added thin slices of red onion between the potatoes and, wow, that was a win
- Sweet potatoes? Tried it. Nice, but didn’t crisp up the same. Still tasty though
- Sometimes I add bacon bits or leftover roast chicken—makes it a meal
- Tried vegan cheese once. It was… an experience (maybe I picked the wrong brand?). If you’ve got a good one, let me know!
If You Don’t Have a Fancy Tool (Equipment Chat)
Look, a sharp knife will do the trick for slicing. If you’ve got a mandoline, it’s handy, but honestly a bit terrifying (I’ve nicked myself more than once). Baking tray, parchment paper if you’re fancy, and a big bowl. If you’re in a real pinch, I’ve even used a pizza pan—came out wonky but still delicious.

How to Store (If You Actually Have Leftovers)
Chuck leftovers in a container and pop in the fridge. They’ll keep 2-3 days (though honestly, in my house, they never make it past the next morning—I caught my partner eating them cold straight from the fridge once, and now that’s kind of a thing).
How We Like to Serve ‘Em
Honestly, I could eat these straight from the tray, but if you want to be civilized, they’re great with a dollop of Greek yogurt or sour cream. We sometimes pile them up and eat with fried eggs for breakfast—my uncle always drizzles a bit of hot sauce on top. Oh, and that time I served them with creamy scrambled eggs—chef’s kiss. If you want to get really wild, serve them as a side for roast chicken or even burgers. (I’ve seen someone dip them in ketchup, but that’s a debate for another day.)
Lessons Learned the Hard Way (Pro Tips)
- I once tried rushing the flipping step. Don’t. You get uneven browning and, dare I say, potato heartbreak.
- Don’t pile the cheese on too early, or it will sort of evaporate into crispy bits. Wait till the end for max melty goodness.
- Actually, if you forget the herbs, it’s not the end of the world—they’re nice, but the potatoes and cheese do most of the heavy lifting.
FAQ: Stuff People Actually Ask Me
- Can you prep these ahead? Sure thing! Slice your potatoes and keep them in cold water until you’re ready, or just roast and reheat with cheese later. I’ve done both when I’m feeling organized (rare, but it does happen).
- What’s the best cheese? Cheddar’s my usual, but mix it up. Smoked cheese is fun, and I’ve even tried a little blue cheese once—strong, but not bad! Mozzarella gets super stringy but not as punchy in flavor.
- Can I make this vegan or dairy free? You can, but pick your cheese carefully. Some vegan cheeses melt, some just kind of… sit there. For some good options, check out this guide from Minimalist Baker.
- Do you need to peel the potatoes? Nah, unless you want to. Skins add texture (and probably vitamins, but I’m no scientist).
- What about leftovers? Reheat in the oven for crispness, or in a skillet if you need to, but they’re not bad cold either, weirdly enough.
Oh, one last thing before you go (slight tangent, sorry): if you somehow have a bunch of leftover cheese, you should totally check out this cheese recipe roundup from BBC Good Food—so many ideas, it’ll make your head spin.
Ingredients
- 4 medium russet potatoes
- 2 tablespoons olive oil
- 1 teaspoon garlic powder
- 1 teaspoon paprika
- 1/2 teaspoon salt
- 1/4 teaspoon black pepper
- 1 1/2 cups shredded cheddar cheese
- 2 tablespoons chopped fresh parsley
Instructions
-
1Preheat the oven to 425°F (220°C). Line a baking sheet with parchment paper.
-
2Wash and slice the potatoes into 1/4-inch thick rounds. Pat dry with a paper towel.
-
3In a large bowl, toss the potato slices with olive oil, garlic powder, paprika, salt, and black pepper until evenly coated.
-
4Arrange the potato slices in a single layer on the prepared baking sheet. Roast for 20 minutes, flipping halfway through.
-
5Sprinkle the shredded cheddar cheese evenly over the potato slices. Return to the oven and bake for an additional 8-10 minutes, or until the cheese is melted and bubbly.
-
6Remove from the oven and garnish with chopped fresh parsley. Serve warm.
Approximate Information for One Serving
Nutrition Disclaimers
Number of total servings shown is approximate. Actual number of servings will depend on your preferred portion sizes.
Nutritional values shown are general guidelines and reflect information for 1 serving using the ingredients listed, not including any optional ingredients. Actual macros may vary slightly depending on specific brands and types of ingredients used.
To determine the weight of one serving, prepare the recipe as instructed. Weigh the finished recipe, then divide the weight of the finished recipe (not including the weight of the container the food is in) by the desired number of servings. Result will be the weight of one serving.
Did you make this recipe?
Please consider Pinning it!!


