
Let Me Tell You Why I Love This So Much
Alright, friend, you know those lazy summer afternoons when you want dessert but also don’t want to heat up the house—or your own patience? That’s when I whip up this Strawberry Shortcake Icebox Cake. Honestly, I’ve made it in everything from a big casserole dish to an ancient lasagna pan that survived three moves (rip to the matching lid). My kids call it “cool cake” because it comes straight from the fridge, and let’s just say, it’s responsible for more than a few mysterious disappearing strawberries in our house. Oh, and don’t get me started on the time I tried making it during a heatwave—pretty sure I nearly melted before the cake did!
Why I Keep Coming Back to This Recipe
I make this when I’m feeling a little lazy but still want to impress. My family goes crazy for this because it’s just so easy to sneak a piece when you open the fridge (not that I’m blaming them, but come on, save me a square!). Sometimes I’ll use it as an excuse to clear out that last sleeve of cookies or the odd container of cream. And yes, there’s a bit of a mess when you slice it, but frankly, that’s part of its charm. Actually, I find it works even better if you assemble it the night before—though waiting is definitely the hardest part.
What You’ll Need (And a Few Cheeky Swaps)
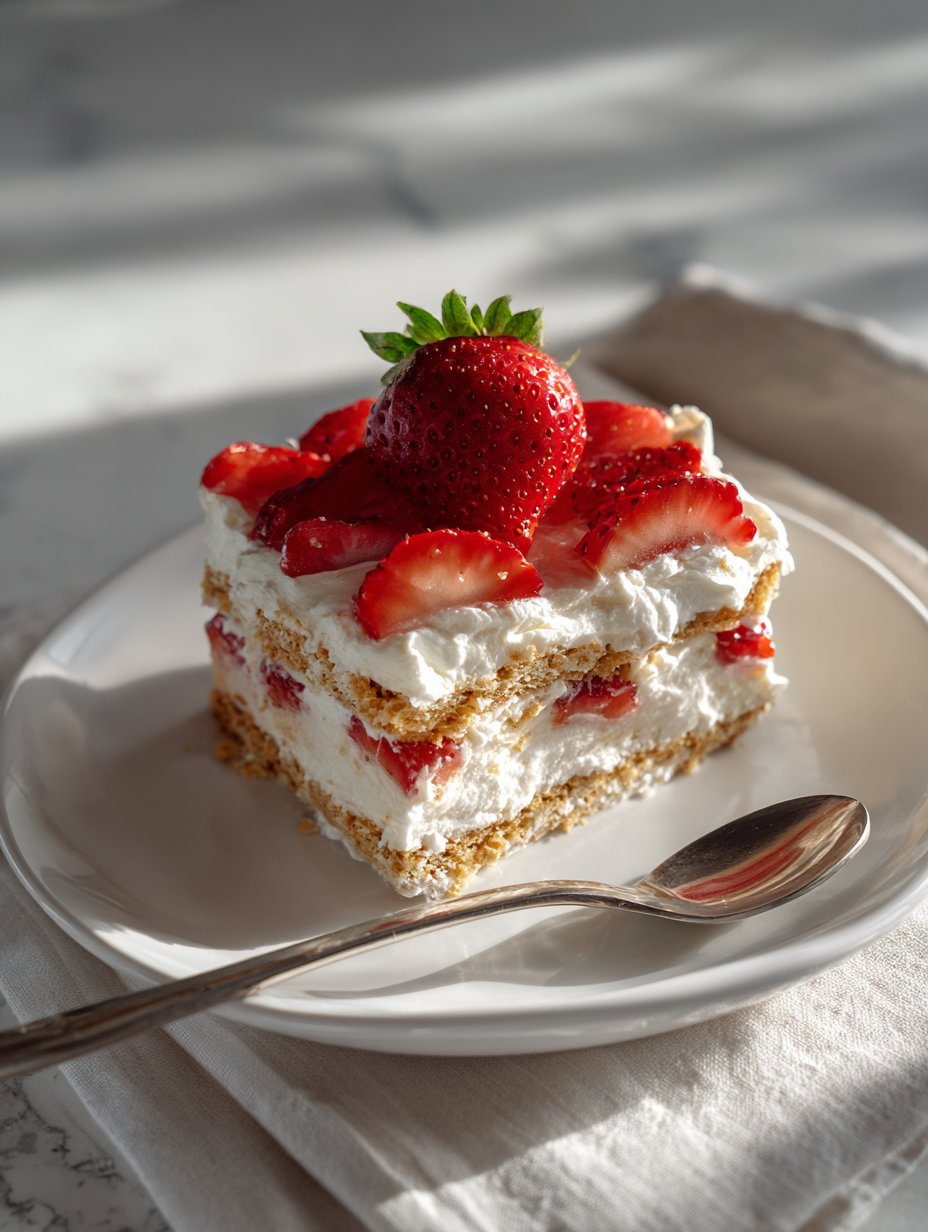
- About 1 pound (450g) fresh strawberries, sliced (I sometimes use thawed frozen ones if it’s out of season—just pat them dry so it doesn’t get soggy)
- 1 box of graham crackers (or good old-fashioned shortbread cookies—my gran swore by McVitie’s, but honestly, store brand is fine)
- 2 cups whipping cream (480ml) – you can use Cool Whip if you’re in a bind, but I beg you, try the real deal at least once
- 1/2 cup powdered sugar (I’ve thrown in a splash of honey when I’ve run out, though it’s not quite the same)
- 1 tsp vanilla extract (I eyeball it, but technically it’s a teaspoon)
- Pinch of salt (it does make a difference, don’t skip!)
- Optional: a handful of blueberries or raspberries for some color, or a drizzle of balsamic glaze if you’re feeling fancy
How I Actually Throw This Together (Don’t Stress!)
- First things first—get yourself a 9×13 inch dish (or whatever’s clean, honestly). Layer the bottom with graham crackers. Don’t worry if they don’t fit perfectly; just break them up and patch the gaps. It’ll all stick together later.
- In a big bowl, whip the cream until soft peaks form. Add powdered sugar, vanilla, and salt, then keep whipping until you get those nice, slightly stiff peaks. This is where I usually sneak a spoonful—someone’s got to check for quality, right?
- Spread a generous layer of whipped cream over the crackers. Top with sliced strawberries (try not to eat half as you go—easier said than done).
- Repeat the layers: crackers, cream, strawberries. I usually get three layers, but sometimes two and a bit (depends how much I taste along the way).
- Finish with a layer of whipped cream and a pretty arrangement of berries on top. Or, just dump them on—life’s too short for perfect rows.
- Cover and pop it in the fridge for at least 4 hours, preferably overnight. This is the hardest step. Waiting. But the longer it sits, the better those flavors meld together. And hey, if you check out King Arthur’s baking site, they’ve got a neat trick for fancy whipped cream, though I rarely bother.
Some Notes That Might Save You Headaches
- If your whipped cream goes a bit runny, it’s probably over-whipped—but just call it “extra creamy.”
- One time I tried using chocolate graham crackers. Not bad, but kind of overpowered the strawberries. But hey, maybe that’s your jam.
- Berries leaking juice? It happens. Just blot them a bit before assembling, or tell everyone it’s “rustic.”
The Wild Experiments (and Mishaps)
- I’ve swapped in lemon curd between layers—super zippy, but honestly, a bit much with the whipped cream.
- Once tried ladyfingers. They turn mushy fast. Not my best work, but still edible (my brother ate the whole thing anyway).
- If you’re dairy-free, coconut whipped cream actually works! Just don’t expect it to hold up as long as dairy does.
What If I Don’t Have All the Tools?
If you don’t have a stand mixer, a good old hand whisk, some elbow grease, and maybe a supportive playlist will do the trick. The only thing that’s really tough to fudge is a deep dish—otherwise, I’ve made mini versions in mugs. Got no spatula? A large spoon works fine. Actually, sometimes I just use my (clean!) hands for the last strawberry layer.
How to Store It (If There’s Any Left)
Cover it up and keep it in the fridge. It’ll last 2-3 days, maybe a bit more, though honestly, in my house it never lasts more than a day! I think it tastes better the next day, when it’s all melded together.
Ideas for Serving (And a Little Family Quirk)
We usually go straight out of the dish, but if I’m feeling generous, I’ll spoon it into little bowls with a sprig of mint. My aunt likes hers with a splash of sherry—more power to her. Oh, and if you want to get really wild, try a scoop of vanilla ice cream on the side. I once saw someone drizzle caramel sauce on top, which actually wasn’t half bad.
Pro Tips I Learned the Hard Way
- Don’t rush letting it chill. I tried serving it after an hour once, and it was more like strawberry cracker soup than cake.
- Make sure your cream is cold before you whip it. Warm cream equals sad, floppy peaks—trust me.
- If you’re using frozen berries, thaw and drain them well or the whole thing gets watery. Learned that one the messy way.
- And, if you’re into kitchen hacks, check out Serious Eats on whipped cream—I skimmed it once and picked up a thing or two.
Questions People Actually Ask Me
- Can I use store-bought whipped topping?
- Yep, no judgment! Sometimes you just can’t be bothered. But—real cream does taste richer, I think.
- Will this work with other fruit?
- Absolutely. Peaches, blueberries, even kiwi. Though banana didn’t go over well—got kinda mushy and weird after a day.
- What if my crackers don’t fit my dish?
- Break them up, puzzle piece style. Actually, sometimes I think it tastes better with rough edges, more places for cream to soak in!
- Can I make it gluten-free?
- Sure! Grab gluten-free grahams or shortbread. Works just fine, though the texture’s a smidge different.
- Do I really have to let it sit overnight?
- Technically, 4 hours is enough. But overnight? That’s how you get the magic happening.
So, there you go—my not-so-perfect but always-devoured version of Strawberry Shortcake Icebox Cake. If you give it a go, let me know how it turned out (or what wild substitutions you tried). Life’s too short not to sneak a taste now and then.
Ingredients
- 2 cups heavy whipping cream
- 1/2 cup powdered sugar
- 1 teaspoon vanilla extract
- 1 pound fresh strawberries, hulled and sliced
- 12 shortcake biscuits or ladyfingers
- 2 tablespoons strawberry jam
- 1 tablespoon lemon juice
- Fresh mint leaves for garnish (optional)
Instructions
-
1In a large mixing bowl, beat the heavy whipping cream, powdered sugar, and vanilla extract together until stiff peaks form.
-
2In a separate bowl, combine the sliced strawberries, strawberry jam, and lemon juice. Toss gently to coat the strawberries.
-
3Arrange a layer of shortcake biscuits or ladyfingers at the bottom of a 9×9-inch baking dish.
-
4Spread a third of the whipped cream over the biscuits, then top with a third of the strawberry mixture. Repeat the layers two more times, finishing with whipped cream and strawberries on top.
-
5Cover the dish with plastic wrap and refrigerate for at least 4 hours or overnight to allow the flavors to meld and the cake to set.
-
6Garnish with fresh mint leaves before serving, if desired. Slice and enjoy chilled.
Approximate Information for One Serving
Nutrition Disclaimers
Number of total servings shown is approximate. Actual number of servings will depend on your preferred portion sizes.
Nutritional values shown are general guidelines and reflect information for 1 serving using the ingredients listed, not including any optional ingredients. Actual macros may vary slightly depending on specific brands and types of ingredients used.
To determine the weight of one serving, prepare the recipe as instructed. Weigh the finished recipe, then divide the weight of the finished recipe (not including the weight of the container the food is in) by the desired number of servings. Result will be the weight of one serving.
Did you make this recipe?
Please consider Pinning it!!


