Let’s Talk About These Tiramisu Trufflesl
You know that feeling when you’re craving a full-on tiramisu but the whole layering, soaking, and chilling marathon just seems—well, a bit much? That’s where these tiramisu trufflesl come to the rescue. First time I made these, it was for a book club night (we “discussed” the book for about seven minutes and then everyone just hovered over the dessert plate). I think I was almost as proud of my coffee-dusted hands as the actual trufflesl. If you love the classic dessert but can’t be bothered faffing around with a double boiler and ladyfinger logistics, you’re in good company. Oh, and fair warning: if you leave them unattended too long, even your shadiest cousin will swipe the last one. Not naming names.
Why I’m Always Making These (No Judgment)
I make these tiramisu trufflesl when I want to look fancy but, honestly, don’t have the patience for a full tiramisu situation. My family goes absolutely bananas for them—especially my dad, who claims he “doesn’t really like dessert” (yeah, right). I’ve made them for everything from lazy Sundays to, oddly enough, a camping trip (they survived about an hour in the cooler). And if you’re anything like me, you’ll appreciate that there’s zero baking. The only thing I sometimes curse about is how sticky my hands get rolling the mixture—kitchen gloves, anyone?
Here’s What You’ll Need—Plus My Cheeky Swaps
- 1 cup (about 125g) mascarpone cheese (I sometimes use full-fat cream cheese when I forget to buy mascarpone and honestly, it gets the job done)
- 1/2 cup espresso or strong coffee, cooled (instant coffee, if you must—just make it strong, my dear!)
- 3 tablespoons coffee liqueur (Kahlúa or whatever’s lurking in your booze cupboard; skip it for kids, obviously)
- 1/4 cup powdered sugar (sometimes I use a bit less if I’m feeling virtuous—rare, but it happens)
- About 18 ladyfingers (savoiardi), crushed into crumbs (my grandma swore by the Matilde Vicenzi ones, but really, any brand will do in a pinch)
- Pinch of salt (I forget this half the time, but it does help the flavors pop)
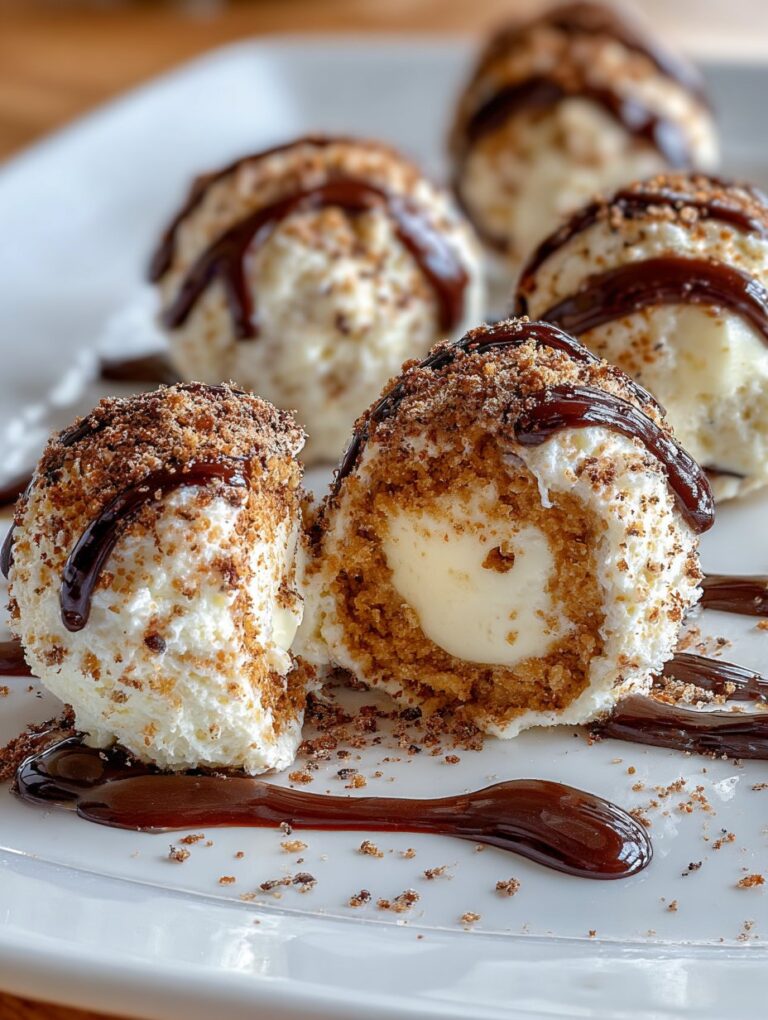
- 1/2 cup dark chocolate, melted (for coating—sometimes I just dust with cocoa powder if I can’t be fussed)
- Cocoa powder, for dusting (totally optional, but I think it looks nice)
How I Actually Make ‘Em (With Occasional Chaos)
- Make the truffle base. In a medium bowl, mix together the mascarpone, cooled coffee, coffee liqueur, and powdered sugar until it’s mostly smooth. (This is where I sometimes get distracted and add too much coffee; if it looks soupy, just add more ladyfinger crumbs… crisis averted!)
- Add the ladyfingers. Stir in the crumbs and salt. It should come together and be kind of sticky, almost like cookie dough but squishier. Don’t worry if it looks weird—it always does right before it sets.
- Chill out. Pop the mixture in the fridge for at least 45 minutes, or until it firms up enough to roll. I sometimes forget and leave it overnight; it’s never hurt.
- Roll ‘em up. Scoop out little spoonfuls (about a heaped teaspoon each) and roll into balls. If it sticks to your hands, run them under cold water first. This is usually when I sneak a taste—chef’s rights!
- Coat in chocolate or cocoa. Dip each ball in the melted chocolate using a fork or two. Or, if you’re feeling lazy, just roll them in cocoa powder. Both ways are grand. Set on parchment paper to set; pop in the fridge if your kitchen is a sweatbox.
Notes From the Battle-Tested Kitchen
- Honestly, more chilling time never hurts. I once tried to rush the rolling part and it was pure mess (ended up with tiramisu fingersl instead—tasty, but not what I was going for).
- If you forget to cool the coffee, you’ll end up with a runnier mix. Just add a few more crumbs—no need to panic.
- The trufflesl actually taste a bit better once they’ve sat overnight, so try not to eat them all straight away (not that that ever happens in my house).
When Curiosity Gets the Best of Me: Variations
- Sometimes I swap the ladyfingers for shortbread crumbs—they’re a bit more buttery, which is fun.
- I once tried adding a splash of amaretto instead of coffee liqueur—worked pretty well, actually.
- Made a batch with white chocolate coating. Meh. Looked cute but the flavor wasn’t my favourite; stick with dark if you ask me.
What If I Don’t Have the Proper Tools?
I used to think you needed a fancy truffle scoop but honestly, two teaspoons work fine. Or just your hands. No food processor? Put your biscuits in a zip-top bag and bash with a rolling pin, or even a mug. Don’t overthink it.

The “But Will It Last?” Storage Situation
Keep your trufflesl in an airtight container in the fridge. They’re good for up to four days—though honestly, in my house it never lasts more than a day! If you want to freeze them, you totally can. Just let them thaw for about 20 minutes before eating (or eat straight from the freezer if you’re feeling impatient—no judgment).
How I Love to Serve These
I like to pile them on a plate, dusted with a bit more cocoa, and serve with strong coffee (not too hot, or the trufflesl melt a bit—ask me how I know). Sometimes we’ll do a whole Italian night and these finish things off perfectly. My aunt dips them in her coffee, which is a bit mad, but she swears by it.
Stuff I Learned the Hard Way—Pro Tips
- Don’t skip the chilling. I tried it once in a hurry and ended up with gooey blobs. Tasty, but not cute.
- If using cream cheese instead of mascarpone, go easy on the coffee or the mix gets too runny.
- When coating in chocolate, use a fork and tap gently on the side of the bowl—otherwise you get a puddle instead of a truffle. Ask me how I know.
Wait, People Actually Ask These?
- Can I make these without alcohol?
Sure can! Just skip the liqueur or swap in a splash more coffee. No one will even miss it (well, maybe some people will). - Do they have to be refrigerated?
Yep, especially if you’re using mascarpone. I mean, unless you want a goo puddle. But if you’re going to eat them all in one go, who cares? - Can I use gluten-free ladyfingers?
Perfectly fine! I’ve used them a bunch. Some brands are a bit crumbly, so just add a little less coffee and you’re golden. - How many does this make?
It really depends on how big you roll them. I usually get about 20-ish, unless someone gets sneaky with the mix. (Looking at you, Ben.) - Can I double the recipe?
Absolutely. Actually, I find it works better if you double it because the trufflesl seem to disappear way too fast otherwise.
That’s pretty much it—tiramisu trufflesl in a nutshell. Or, you know, in a truffle. If you’re looking for more Italian dessert magic (or just want to go down a rabbit hole), this classic tiramisu guide is my go-to for the full shebang, but for something quick and bite-sized, give these a whirl. And if they don’t come out perfect, well, just dust them with a little extra cocoa and pretend that was the plan all along!
Ingredients
- 1 cup (100g) ladyfingers, finely crushed
- 4 oz (115g) mascarpone cheese, softened
- 1/2 cup (60g) powdered sugar
- 2 tablespoons brewed espresso, cooled
- 1 teaspoon vanilla extract
- 1/2 cup (90g) semi-sweet chocolate chips, melted
- 1/4 cup (25g) unsweetened cocoa powder, for dusting
- 1 tablespoon coffee liqueur (optional)
Instructions
-
1In a medium bowl, combine the crushed ladyfingers, mascarpone cheese, powdered sugar, brewed espresso, vanilla extract, and coffee liqueur (if using). Mix until a smooth dough forms.
-
2Cover the mixture and refrigerate for 20 minutes to firm up.
-
3Scoop out tablespoon-sized portions and roll into balls using your hands.
-
4Dip each truffle into the melted chocolate, allowing any excess to drip off.
-
5Place the truffles on a parchment-lined tray and dust with cocoa powder.
-
6Chill the truffles in the refrigerator for at least 10 minutes before serving.
Approximate Information for One Serving
Nutrition Disclaimers
Number of total servings shown is approximate. Actual number of servings will depend on your preferred portion sizes.
Nutritional values shown are general guidelines and reflect information for 1 serving using the ingredients listed, not including any optional ingredients. Actual macros may vary slightly depending on specific brands and types of ingredients used.
To determine the weight of one serving, prepare the recipe as instructed. Weigh the finished recipe, then divide the weight of the finished recipe (not including the weight of the container the food is in) by the desired number of servings. Result will be the weight of one serving.
Did you make this recipe?
Please consider Pinning it!!


