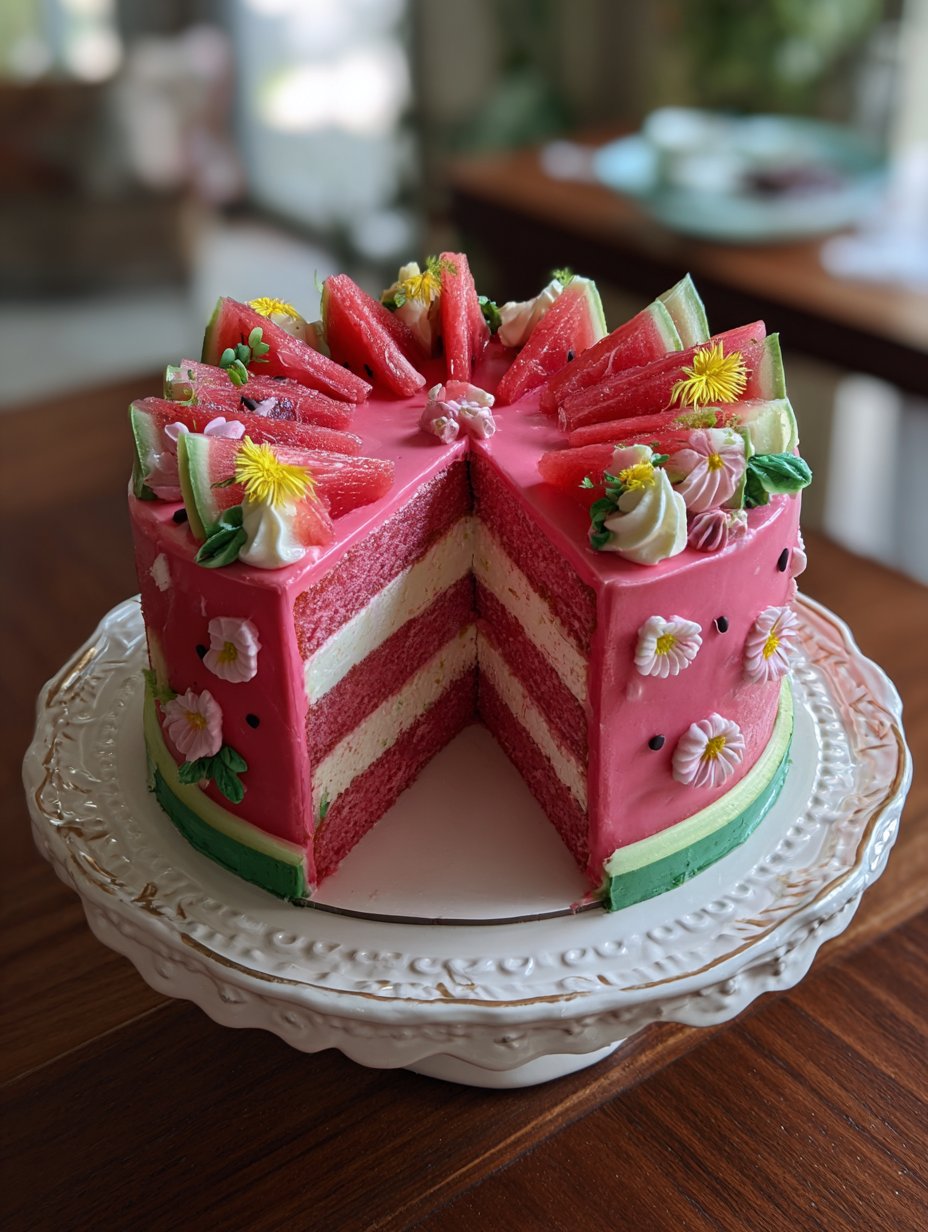
Let’s Talk Watermelon Birthday Cake (The Kind That Doesn’t Drip Everywhere)
Hey there! So, let me tell you about the time my kid insisted on a “watermelon cake that doesn’t taste like watermelon but looks exactly like it” for their birthday. I mean, how specific can you get? The first time I made this, the kitchen turned into what looked like a paint explosion crossed with a baking show meltdown. But we laughed, ate cake, and now it’s kind of tradition around here. If you’ve ever wanted to impress your friends or confuse your tastebuds (in a good way), this is the cake for you. Don’t worry if your icing is a bit lopsided; it’s all part of the charm. Also, quick warning – don’t eat the cake seeds. They’re chocolate chips. Yes, I know someone who did.
Why You’ll Love Making This (Besides the Bright Colors!)
I always make this when I want a cake that screams summer but doesn’t actually require me to buy a whole watermelon and carry it home (those things are heavy, right?). My family goes nuts for the vibrant pink and green layers, even though they’ve seen it a hundred times. And honestly, when you’re short on time, the boxed cake mix version is just as fun. Oh, and if you have a thing about food coloring, you can absolutely tone it down, though it won’t be quite as Instagrammable. Sometimes the hardest part is not eating the chocolate chips before they go on the cake. Or, let’s be honest, sometimes I just use raisins if I’m out and nobody notices except me. The best part? It looks way fancier than it actually is to make (promise).
What You’ll Need (And What You Can Swap)
- 2 1/2 cups flour (grandma always swore by King Arthur, but whatever’s in the pantry works fine)
- 2 tsp baking powder
- 1/2 tsp salt
- 1 3/4 cups sugar (sometimes I do a mix of white and light brown – gives it a slightly caramel flavor)
- 1 cup unsalted butter, softened (margarine in a pinch – but the taste is better with butter, trust me)
- 5 egg whites (I’ve used 3 whole eggs when feeling lazy. The color isn’t as bright, but hey, less waste!)
- 1 cup milk or unsweetened non-dairy milk (I like oat milk, but almond is grand too)
- 2 tsp vanilla extract (the real stuff if you’ve got it, but I promise nobody will call you out for using the imitation one)
- Red and green gel food coloring (liquid works, but the color’s softer)
- 1/2 cup mini chocolate chips (or raisins; or leave ’em out if you’re not into the “seeds” idea)
- Buttercream frosting – homemade or store-bought, I won’t judge
- Green sprinkles for the “rind” (optional, but fun!)
How I Actually Put It All Together (With the Occasional Mess)
- Preheat your oven to 350°F (180°C). Grease two 8-inch round cake pans. Or three if you want a taller cake. (Honestly, I’ve stacked it with just one once and it was fine, if a bit squat.)
- In a big bowl, whisk together flour, baking powder, and salt. I just use a fork if I can’t find my whisk.
- In another bowl, beat the sugar and butter until it’s fluffy – like clouds if clouds were made of sugar (about 2-3 minutes). I use a hand mixer, but a wooden spoon and some elbow grease work in a pinch.
- Add the egg whites, one at a time, mixing after each. Sometimes I forget and dump them all in at once. Still works.
- Pour in the vanilla. Mix some more.
- Add the flour mixture and milk in turns – a bit of flour, a splash of milk, repeat. This is where I usually get distracted and spill some. It’s fine.
- Scoop out about 2/3 of the batter into a new bowl. Tint this with red or pink food coloring until it looks, well, watermelony. You can always add more but can’t take it away, so go slow.
- Mix in the mini chocolate chips (or whatever you’re using for seeds). Give it a quick stir. This is where I taste-test, just in case.
- The rest of the batter gets colored green. Don’t worry if it’s a weird shade – once it’s baked, it all comes together. Pour half the pink/red batter into each pan, then dollop the green around the edges for the “rind.” Swirl it a little or leave it – both work.
- Bake for about 28-32 minutes, or until a skewer comes out clean (or until you can’t smell raw flour anymore – I go by nose sometimes).
- Let cool in pans for 10 minutes, then flip onto cooling racks. If one breaks, just glue it together with frosting. No one will know.
- Frost with white or green buttercream. I sometimes pipe (more like blob) green stripes for a real watermelon rind effect. Sprinkle with green sanding sugar if you’re feeling fancy.
- Chill for about 30 minutes before slicing, if you can wait. I rarely can.
Stuff I Learned the Hard Way (Notes)
- If you over-mix the batter, the colors can get muddy. But it’s still tasty.
- Gel food colors are less likely to mess up the batter texture, but if you only have liquid, use a bit less milk.
- Don’t panic if the cake cracks – it’s a watermelon, not a porcelain vase.
- Actually, I find it works better if I let the cakes cool completely before frosting. Once I didn’t, and the frosting went for a slide.
Experiments I’ve Tried (And One I Won’t Do Again)
- Subbing in matcha for green coloring. Looked all right, tasted a bit too leafy for my crew.
- Coconut cream frosting for a tropical twist – so good, especially on a hot day.
- I once tried filling the middle with fresh watermelon chunks. Don’t. It made the cake soggy as a bath mat and nobody wanted seconds.
What If I Don’t Have That Fancy Tool?
If you don’t have two cake pans, just bake in shifts or use one and slice it in half (carefully, with a bread knife – or a bit unevenly if you’re me). For frosting, a butter knife does the job. I’ve even used a spatula meant for pancakes. Not ideal, but it gets the job done.

How I Store It (Well, Try To)
Keep leftovers covered in the fridge for up to three days, though honestly, in my house it never lasts more than a day! If you somehow have self-control, the flavors actually mingle a bit and I think it tastes even better the next day.
Serving It Up
Slice thick wedges and serve cold for that real watermelon vibe. My family likes it best with a scoop of vanilla ice cream on the side – or, if it’s a birthday, with candles jammed in at wild angles. And I always save the biggest slice for myself (perks of being the baker, right?).
What I’d Tell Myself If I Could Go Back (Pro Tips)
- I once tried rushing the cooling step and regretted it – the layers slid around like a deck of cards. Patience pays off.
- Don’t use too much food coloring. I learned this the hard way when my cousin’s tongue stayed pink for a day.
- Actually, if you’re making this for someone who hates chocolate, swap the chips for sunflower seeds (not roasted). They look cool, though taste-wise, not my favorite.
FAQ – Real Questions I’ve Gotten (And Actually Answered… Kind Of)
- Does it taste like actual watermelon?
- Nope! It just looks like one. If you want watermelon flavor, you could probably use a bit of watermelon extract, but I haven’t tried it. Yet.
- Can I make this gluten-free?
- Absolutely. Use your favorite gluten-free flour blend. One friend swears by Bob’s Red Mill 1-to-1. (Here’s a link with reviews: Bob’s Red Mill Gluten-Free Flours.)
- What’s the best food coloring?
- I like AmeriColor gels, but honestly Wilton is just fine. I once tried a natural beet-based one, but the color wasn’t super vibrant. If you want to geek out, Sally’s Baking Addiction compares food colorings quite well.
- Do you have to use buttercream?
- No way. Cream cheese frosting tastes ace, or even whipped cream if you’re serving right away. (Just don’t try fondant unless you enjoy a sticky challenge.)
- How do you get the layers so neat?
- Honestly? Practice. Or a cake leveler. But if it’s wonky, call it “rustic” and everyone will still eat it.
Side note before I forget: if you want to get really wild, you can make cupcakes using the same method. Just shorten the baking time to about 16-18 minutes. The kids in our neighborhood call them “mini melons” – which is cute, but also a bit confusing for the uninitiated.
So there you have it: my not-so-perfect but very fun watermelon-inspired birthday cake. If you give it a go, let me know how it turned out – or what wild spins you try. Happy baking (and happy cake eating)!
Ingredients
- 2 1/2 cups all-purpose flour
- 2 cups granulated sugar
- 1 cup unsalted butter, softened
- 4 large eggs
- 1 cup whole milk
- 2 teaspoons vanilla extract
- 1/2 cup mini chocolate chips
- Red, green, and black gel food coloring
- 3 cups buttercream frosting
Instructions
-
1Preheat the oven to 350°F (175°C). Grease and line two 9-inch round cake pans.
-
2In a large bowl, cream together the butter and sugar until light and fluffy. Add eggs one at a time, beating well after each addition. Mix in vanilla extract.
-
3Alternate adding flour and milk to the batter, beginning and ending with flour. Mix until just combined.
-
4Divide the batter: Tint most of it with red food coloring and fold in mini chocolate chips to mimic watermelon seeds. Tint a small portion with green food coloring for the cake’s outer edge.
-
5Pour the red batter into the center of each pan and surround with green batter at the edges. Bake for 30-35 minutes or until a toothpick comes out clean. Cool completely.
-
6Frost the cake with green buttercream on the sides and red on top. Use black food coloring or extra chocolate chips to create watermelon seeds on the surface. Slice and serve.
Approximate Information for One Serving
Nutrition Disclaimers
Number of total servings shown is approximate. Actual number of servings will depend on your preferred portion sizes.
Nutritional values shown are general guidelines and reflect information for 1 serving using the ingredients listed, not including any optional ingredients. Actual macros may vary slightly depending on specific brands and types of ingredients used.
To determine the weight of one serving, prepare the recipe as instructed. Weigh the finished recipe, then divide the weight of the finished recipe (not including the weight of the container the food is in) by the desired number of servings. Result will be the weight of one serving.
Did you make this recipe?
Please consider Pinning it!!


